Zalando tailor で Micro Frontends with ( LitElement & etcetera)
Zalando 社が開発した Tailor を使って、サンプル Web アプリを Micro Frontends で構築してみました。Tailor はサーバーサイドで統合するアーキテクチャです。クライアントサイドは、Web Components で作られている Lit Element を使って統合しました。どういった内容か、ここに投稿しようと思います。
作ったリポジトリは、下記に残しています。 https://github.com/silverbirder/micro-frontends-sample-code-4
全体構成

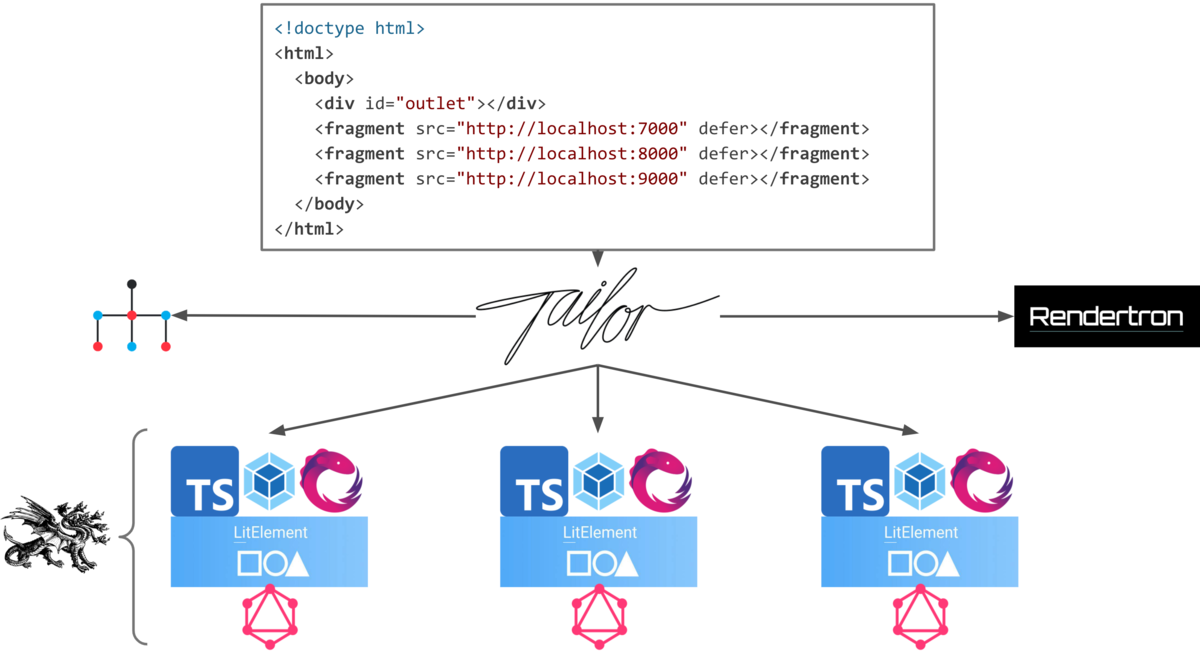
ざっくり説明すると、HTML から Tailor に対してフラグメント(コンポーネント)を取得・返却するようにします。各フラグメントは、LitElement で WebComponents を定義させた Javascript を指します。フラグメントを読み込むだけで、カスタムエレメントを使えるようになります。
Tailor

https://github.com/zalando/tailor
A streaming layout service for front-end microservices
tailor は、ストリーミングレイアウトサービスというだけあって、fragment の load をストリーミングするそうです。(こちらのライブラリは、Facebook のBigPipe に影響されたそう)
まず、tailor.js の HTML テンプレートは次のとおりです。
templates/index.html
<body>
  <div id="outlet"></div>
  <fragment src="http://localhost:7000" defer></fragment>
  <fragment src="http://localhost:8000" defer></fragment>
  <fragment src="http://localhost:9000" defer></fragment>
</body>
これらの fragment の取得は、tailor.js を経由します。
tailor.js
const http = require("http");
const Tailor = require("node-tailor");
const tailor = new Tailor({
  templatesPath: __dirname + "/templates",
});

http
  .createServer((req, res) => {
    req.headers["x-request-uri"] = req.url;
    req.url = "/index";
    tailor.requestHandler(req, res);
  })
  .listen(8080);
x-request-uri は、後ろのフラグメントに URL を引き継ぐためのようです。 そして、フラグメントサーバーは、次のとおりです。
fragments.js
const http = require("http");
const url = require("url");
const fs = require("fs");

const server = http.createServer((req, res) => {
  const pathname = url.parse(req.url).pathname;
  const jsHeader = { "Content-Type": "application/javascript" };
  switch (pathname) {
    case "/public/bundle.js":
      res.writeHead(200, jsHeader);
      return fs.createReadStream("./public/bundle.js").pipe(res);
    default:
      res.writeHead(200, {
        "Content-Type": "text/html",
        Link: '<http://localhost:8000/public/bundle.js>; rel="fragment-script"',
      });
      return res.end("");
  }
});

server.listen(8000);
fragments.js は、Response Header に Link ヘッダを追加するようにします。Tailor は、このヘッダの Javascript を読み込むことになります。
さらに、fragments.js は、Link ヘッダで指定されたリクエストを return fs.createReadStream('./public/bundle.js').pipe(res) でストリームのパイプを返すそうです。
Lerna

それぞれのフラグメントを Lerna で管理するようにします。 私は、下記のような packages 分けをしました。
- common
- 共通する変数・ライブラリ
- fragment
- LitElement のカスタムエレメント定義
- function
- フラグメントと連携する関数 (ヒストリーやイベントなど)
具体的に言うと、次のようなものを用意しました。
| directoy name | package name |
|---|---|
| packages/common-module | @type/common-module |
| packages/common-variable | @type/common-variable |
| packages/fragment-auth-components | @auth/fragment-auth-components |
| packages/fragment-product-item | @product/fragment-product-item |
| packages/fragment-search-box | @search/fragment-search-box |
| packages/function-event-hub | @controller/function-event-hub |
| packages/function-history-navigation | @controller/function-history-navigation |
| packages/function-renderer-proxy | @controller/function-renderer-proxy |
| packages/function-search-api | @search/function-search-api |
| packages/function-service-worker | @type/function-service-worker |
どの名前も、その時の気分で雑に設定したので、気にしないでください。(笑) 伝えたいのは、@XXX が 1 チームで管理する領域みたいなことをしたかっただけです。
package を使いたい場合は、次のような依存を設定します。
package.json
{
  "dependencies": {
    "@controller/function-event-hub": "^0.0.0",
    "@type/common-variable": "^0.0.0"
  }
}
LitElement

https://lit-element.polymer-project.org/
LitElement A simple base class for creating fast, lightweight web components
純粋な WebComponents だけを使えばよかったのですが、次のような理由で LitElement を使いました。
- Typescript が書ける
- レンダリングパフォーマンスの良い lit-html が使える
- プロパティ変化によるレンダリング更新ができる
まあ、特にこだわりはないです。 書き方は、次のとおりです。
import { LitElement, html, customElement, css, property } from "lit-element";

@customElement("product-item")
export class ProductItem extends LitElement {
  static styles = css`
    :host {
      display: block;
      border: solid 1px gray;
      padding: 16px;
      max-width: 800px;
    }
  `;
  @property({ type: String })
  name = ``;

  render() {
    return html`<div>${this.name}</div>`;
  }
}

declare global {
  interface HTMLElementTagNameMap {
    "product-item": ProductItem;
  }
}
LitElement + Typescript では、open-testing を使ってテストすることができます。 https://github.com/PolymerLabs/lit-element-starter-ts/blob/master/src/test/my-element_test.ts
また、jest でもテストができるようです。
https://www.ninkovic.dev/blog/2020/testing-web-components-with-jest-and-lit-element
DynamicRendering

このサンプルでは、カスタムエレメントを使って、ブラウザ側でレンダリングする 所謂 SPA の動きで構築しています。 『SEO ガー!』と SSR しなきゃと思う訳ですが、正直 SSR を考えたくないです。(ハイドレーションなんて無駄なロードをブラウザにさせたくない) 次の記事のように、ボットのアクセスのみに、ダイナミックレンダリングした結果(SPA のレンダリング結果 HTML)を返すようにしたいです。
https://developers.google.com/search/docs/guides/dynamic-rendering?hl=ja
技術的には、次のようなものを使えば良いです。
https://github.com/GoogleChrome/rendertron
function-renderer-proxy/src/renderer.ts
...
const page = await this.browser.newPage(); // browser: Puppeteer.Browser
...
const result = await page.content() as string;  // Puppeteerのレンダリング結果コンテンツ(HTML)
要は、Puppeteer で実際にレンダリングさせた結果を Bot に返却しているだけです。
EventHub
フラグメント同士は、CustomEvent を通して連携します。
https://developer.mozilla.org/ja/docs/Web/Guide/Events/Creating_and_triggering_events
全て、この CustomEvent と AddEventListener を管理する EventHub(packages 名)を経由するようにします。(理想)
History
ページ全体のヒストリーは、HistoryNavigation(packages 名)で管理したいと考えています。(理想)
https://developer.mozilla.org/en-US/docs/Web/API/History_API
また、ルーティングを制御する Web Components 向けライブラリ vaadin/router も便利そうだったので導入してみました。
ShareModule
LitElement のようなどこでも使っているライブラリは、共通化してバンドルサイズを縮めたいです。 Webpack のようなバンドルツールには、External や DLLPlugin、ModuleFederation などの共通化機能があります。
https://webpack.js.org/concepts/module-federation/
今回は、external を使っています。
common-module/common.js
exports["rxjs"] = require("rxjs");
exports["lit-element"] = require("lit-element");
exports["graphql-tag"] = require("graphql-tag");
exports["graphql"] = require("graphql");
exports["apollo-client"] = require("apollo-client");
exports["apollo-cache-inmemory"] = require("apollo-cache-inmemory");
exports["apollo-link-http"] = require("apollo-link-http");
common-module/webpack.config.js
module.exports = {
  entry: "./common.js",
  output: {
    path: __dirname + "/public",
    publicPath: "http://localhost:6006/public/",
    filename: "bundle.js",
    libraryTarget: "amd",
  },
};
共通化したライブラリは、次の Tailor の index.html で読み込みます。
templates/index.html
<script>
  (function (d) {
    require(d);
    var arr = [
      "lit-element",
      "rxjs",
      "graphql-tag",
      "apollo-client",
      "apollo-cache-inmemory",
      "apollo-link-http",
      "graphql",
    ];
    while ((i = arr.pop()))
      (function (dep) {
        define(dep, d, function (b) {
          return b[dep];
        });
      })(i);
  })(["http://localhost:6006/public/bundle.js"]);
</script>
そうすると、例えば searchBox の webpack では、次のようなことが使えます。
fragment-search-box/webpack.config.js
externals: {
    'lit-element': 'lit-element',
    'graphql-tag': 'graphql-tag',
    'apollo-client': 'apollo-client',
    'apollo-cache-inmemory': 'apollo-cache-inmemory',
    'apollo-link-http': 'apollo-link-http',
    'graphql': 'graphql'
}
その他
その時の気分で導入したものを紹介します。(or 導入しようと考えたもの)
GraphQL
API は、雑に GraphQL を採用しました。特に理由はありません。
SkeltonUI
Skelton UI も使ってみたいなと思っていました。
https://material-ui.com/components/skeleton/
React を使わなくても、CSS の@keyframes を使えば良いでしょう。が、まあ使っていません。(笑)
https://developer.mozilla.org/ja/docs/Web/CSS/@keyframes
Rxjs
typescript の処理をリアクティブな雰囲気でコーディングしたかったので導入してみました。
(リアクティブに詳しい人には、怒られそうな理由ですね...笑)
所感
これまで、Podium、Ara-Framework, そして Tailor といった Micro Frontends に関わるサーバーサイド統合ライブラリを使ってみました。
https://silverbirder.github.io/blog/contents/microfrontends
https://silverbirder.github.io/blog/contents/ara-framework
これらは、どれも考え方が良いなと思っています。 Podium のフラグメントのインターフェース設計、Ara-Framework の Render とデータ取得の明確な分離、そして Tailor のストリーム統合です。 しかし、これらは良いライブラリではありますが、プロダクションとしてはあんまり採用したくない(依存したくない)と思っています。
むしろ、もっと昔から使われていた Edge Side Include や Server Side Include などを使ったサーバーサイド統合の方が魅力的です。 例えば、Edge Worker とか良さそうです。(HTTP2 や HTTP3 も気になります)
まあ、まだ納得いく Micro Frontends の設計が発見できていないので、これからも検証し続けようと思います。
シェアしよう
関連するタグ
- 手軽に安い食材を見つけられるアプリ「ぼちぼち」を開発
- Qwikでブログページを刷新して学んだこと
- ライティングの効率化ツール:AI Ghostwriterの紹介
- Stable Diffusion API 開発
- Micro Frontendsで組成するフラグメントをWeb Componentsで定義してModule Federationで共有する
- OEmbedとOGPのWebComponentsを作ったので、自分のブログサイトに使う
- Chrome拡張機能(Manifest V3)の開発で知ったこと
- Markdownで執筆するなら、WebComponentsが使えるSSG、Rocketがオススメ!
- silverbirderのポートフォリオページ刷新(v2)
- Googleアカウント画像を返却するだけのAPIを作った
- TikTokスクレイプ基盤をGCP上で構築してハマったこと
- クライアントサイド(ES Module)でMicro Frontends
- Ara-Framework で Micro Frontends with SSR
- ZoomのMeetingを自動生成するGASライブラリ zoom-meeting-creator を作った
- アカウント画像一括更新ツールを作ったので、紹介と学びについて
- TwitterにあるLinkを収集するツール Cotlin で、世界中のプレゼンテーション資料を知ろう
- GMailをGCalendarに登録するサービス rMinc を作ってみた
- 1コマ漫画検索サービスTiqav2 (Algolia + Cloudinary + Google Cloud Vision API) 作ってみた
