Learning How Browsers Work
As a web front-end engineer, it's only natural to be interested in how browsers work. In this article, I will document the process of learning about the workings of a browser.
Everyone Loves Chrome
When it comes to browsers loved by web front-end engineers, it's IEChrome, isn't it?
Checking the behavior of HTML, CSS, and JS in a browser is a daily routine.
It's a well-known fact among web front-end engineers that browsers behave differently.
So, why do they behave differently?
- "Because the rendering engine is different~"
- "Because the Javascript engine is different~"
I think you probably know that much. So, how does this rendering engine work? You're curious, aren't you?
About Chromium
I think many of you probably know about Chromium, so I'll explain it briefly.
Chromium is the name of an open-source project and also a browser. Chrome is developed based on Chromium. For a detailed explanation, please see Chromium - Wiki.
Being open-source means that anyone can read the source code. Then, you can understand how the browser works! Yay! 😎
Reverse Engineering Chromium
Let's take a look at the source code of Chromium.
Here it is.
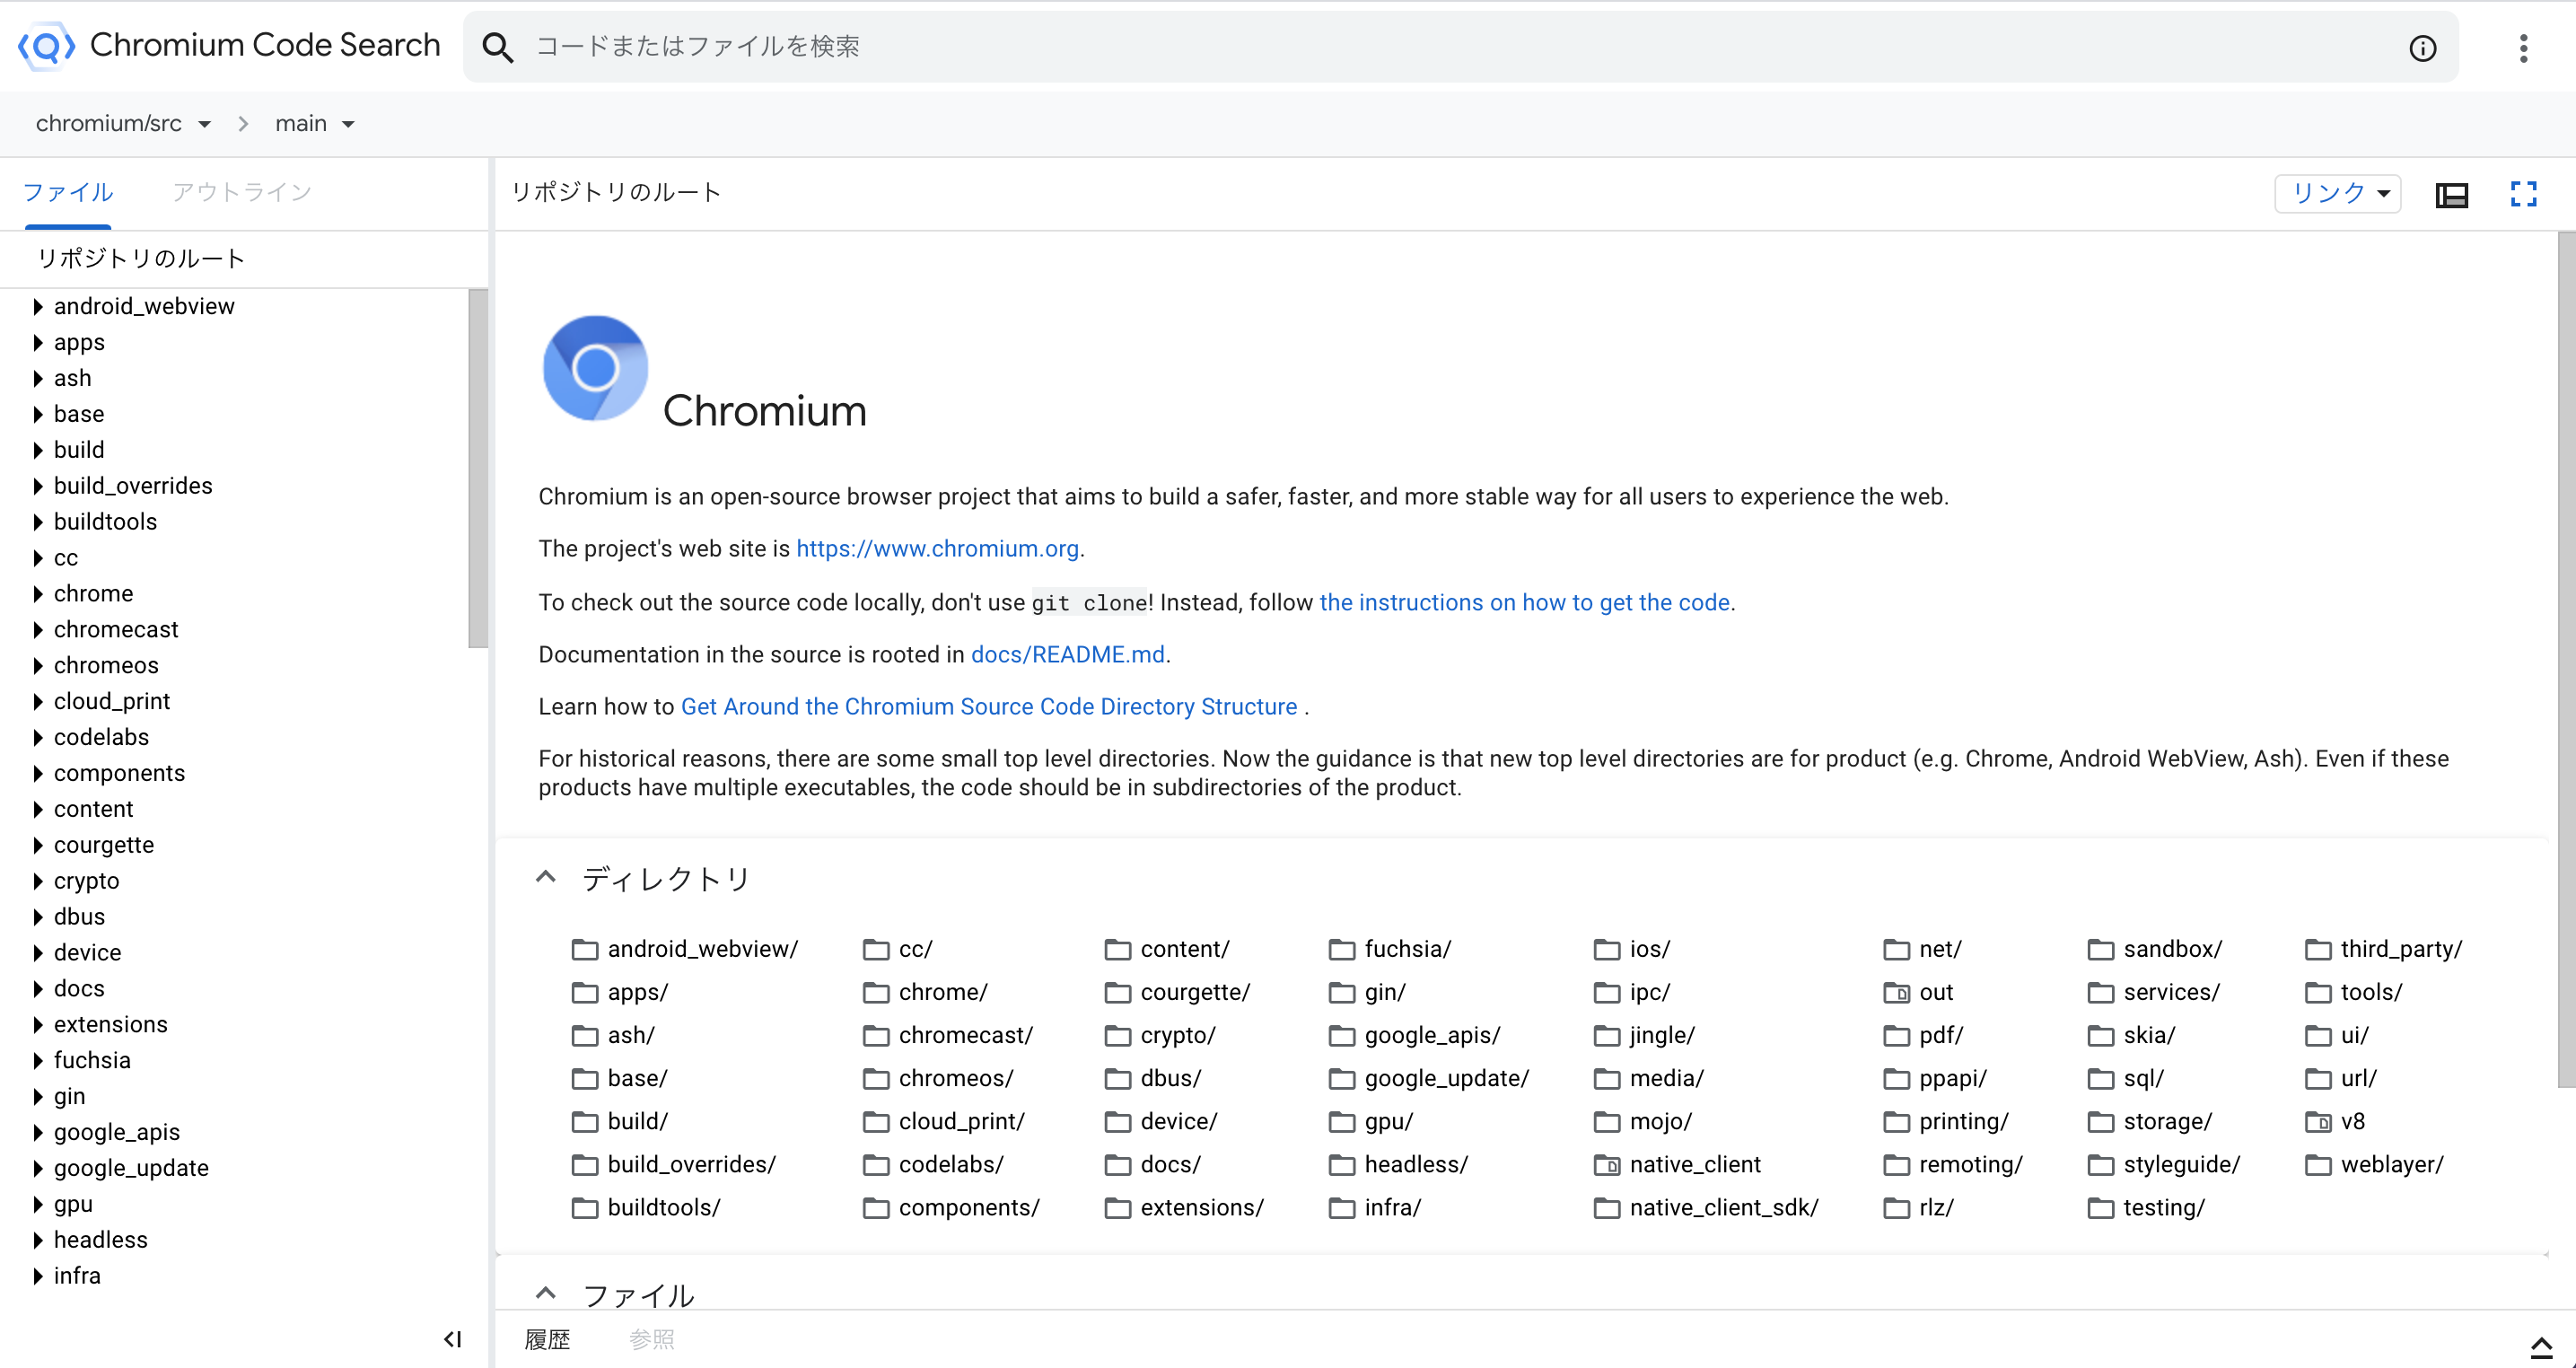
According to Chromium - Wiki, Chromium's source code is about 35 million lines long. Moreover, the language is C++. I'm not very familiar with it 😞.
I actually checked out the source code to my local machine (Macbook Air) and tried to build it. Partly because my machine is weak, it took me about half a day to build. I'm exhausted. With this, it doesn't seem like I can easily check the operation of the browser.
Reading Materials on How Browsers Work
I decided to change my approach and read the following materials.
- How Browsers Work: Behind the scenes of modern web browsers
- The article was published on August 5, 2011, so it might be a bit outdated.
Let's take a look. The first thing that catches my eye is the main components of a browser.
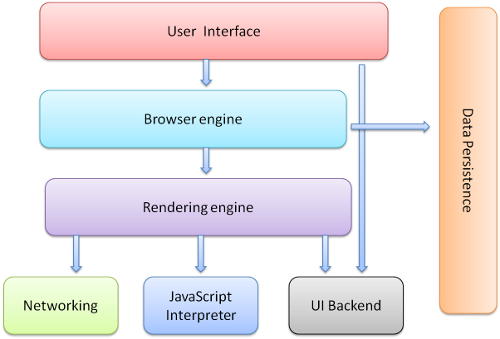
We will focus on the user interface, browser engine, and rendering engine among the components. Each has the following roles.
- User Interface
- Responsible for UI such as address bar and back/forward buttons
- Browser Engine
- Organizes processing between UI and rendering engine
- Rendering Engine
- Responsible for displaying requested content (such as HTML)
By the way, Chromium's rendering engine used to use webkit, but it has changed to blink.
The basic flow of the browser is as shown in the following figure.

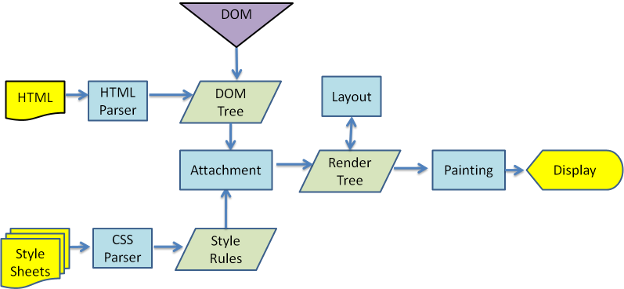
- Parsing HTML to construct the DOM tree
- Render tree construction
- Layout of the render tree
- Painting the render tree
Let's look at each one.
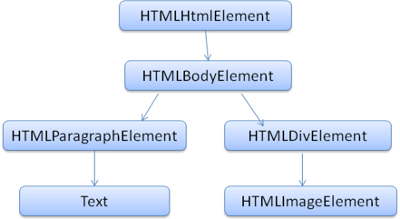
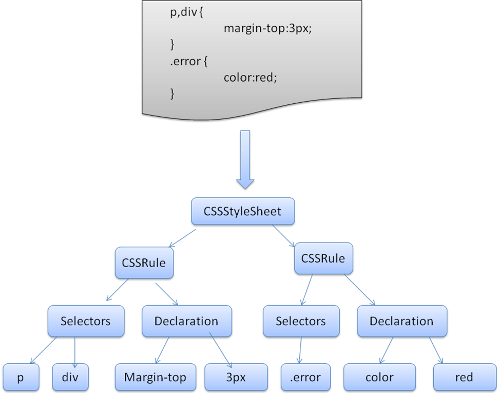
① Parsing HTML to construct the DOM tree
1 is to construct the DOM tree using a lexer (lexical analysis. ex:flex) and parser (syntax analysis. ex:bison).
The lexer identifies tokens while managing the reading state with a state machine. Spaces and comments are removed.
The tokens identified by the lexer are passed to the parser for syntax analysis. HTML is a context-free grammar with DTD (Document Type Definition), so it can be mechanically analyzed. However, HTML has a generous specification, allowing patterns like the following.
</br>instead of<br />- Lost tables
- Nested form elements
- Too deep tag hierarchy
- Misplaced html or body end tags
The parser builds the DOM (Document Object Model). The DOM turns the previous plain text into an object model with an API, making it easier to process using the DOM from now on.
So far, we have been talking about HTML, but CSS is also processed in parallel, creating an object called a render object. This is an object with style information attached. Basically, CSS and HTML are independent of each other, so they can be processed in parallel. For example, processing CSS should not change HTML.
However, Javascript is a different story, and when Javascript is loaded, HTML parsing is interrupted and Javascript parsing begins. Also, if Javascript accesses certain style properties that may be affected by stylesheets that have not yet been loaded, Javascript is blocked.
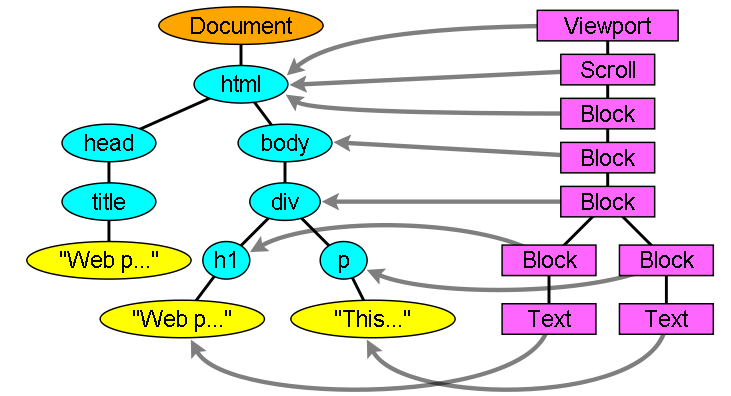
② Render tree construction
From the DOM and render objects of ①, we construct a render tree.
The DOM and render objects are not one-to-one, for example, the head element and elements with display:none; are not included in the render tree.
The render tree is updated every time the DOM tree is updated.
We calculate the style from the render objects, but it's a bit complicated. For more details, please see Style Computation.
③ Layout of the render tree
From the render tree, we calculate the layout information. Layout information is the position (x,y) and size (width,height).
We recursively calculate the layout information (layout method) from the root of the render tree.
- The parent renderer determines its own width.
- The parent checks the child and,
- Places the child renderer (sets x and y).
- If necessary, it calls the child's layout method. This calculates the height of the child.
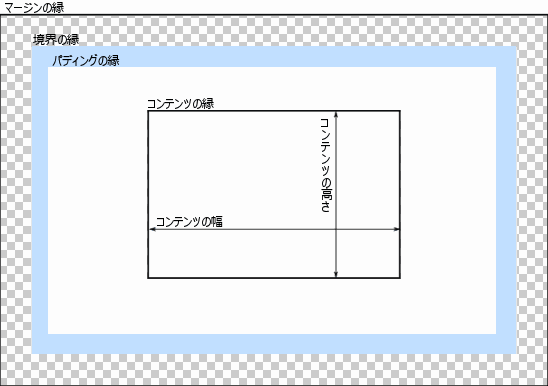
- The parent sets its own height using the accumulated height of the child, the height of the margin, and the padding. This height is used by the parent renderer's parent.
※ Refer to Layout Processing
I will share a diagram of the CSS box model for reference.
④ Painting the render tree
Finally, we paint. We will consider the method of placement, i.e., where to paint. Broadly, it is divided into three.
- Normal
- Objects are placed according to their location in the document. That is, the location in the render tree is the same as the location in the DOM tree, and it is laid out according to the type and dimensions of the box.
- position:static,relative
- Objects are placed according to their location in the document. That is, the location in the render tree is the same as the location in the DOM tree, and it is laid out according to the type and dimensions of the box.
- Float
- Objects are first laid out like a normal flow and then moved as far to the left or right as possible.
- float:right,left
- Objects are first laid out like a normal flow and then moved as far to the left or right as possible.
- Absolute
- Objects are placed in a different location in the render tree than in the DOM tree.
- position:absolute,fixed
- Objects are placed in a different location in the render tree than in the DOM tree.
Once you understand the positioning scheme, you will consider the shape to paint. It's block boxes and inline boxes.
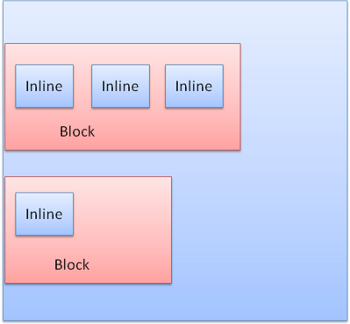
Block boxes are rectangular in shape and are arranged vertically. Inline boxes do not have their own shape and are arranged horizontally.
For properties like z-index, you need to know the concept of stacking context. For more details, please check Stacking Context - developer.mozilla.org.
Let's Build a Browser
In the previous chapter, we were able to understand how browsers work through the materials. Don't you want to understand not just by reading, but by moving it? Yes, let's build it ourselves.
The following article about building a browser, written by someone developing a browser engine called Servo in Rust, is very easy to understand.
- Let's build a browser engine! Part 1: Getting started
- mbrubeck/robinson
- Toy browser engine(mbrubeck)
- Made with Rust
- mbrubeck/robinson
The main flow of the Toy browser engine(mbrubeck) is very similar to the story so far.
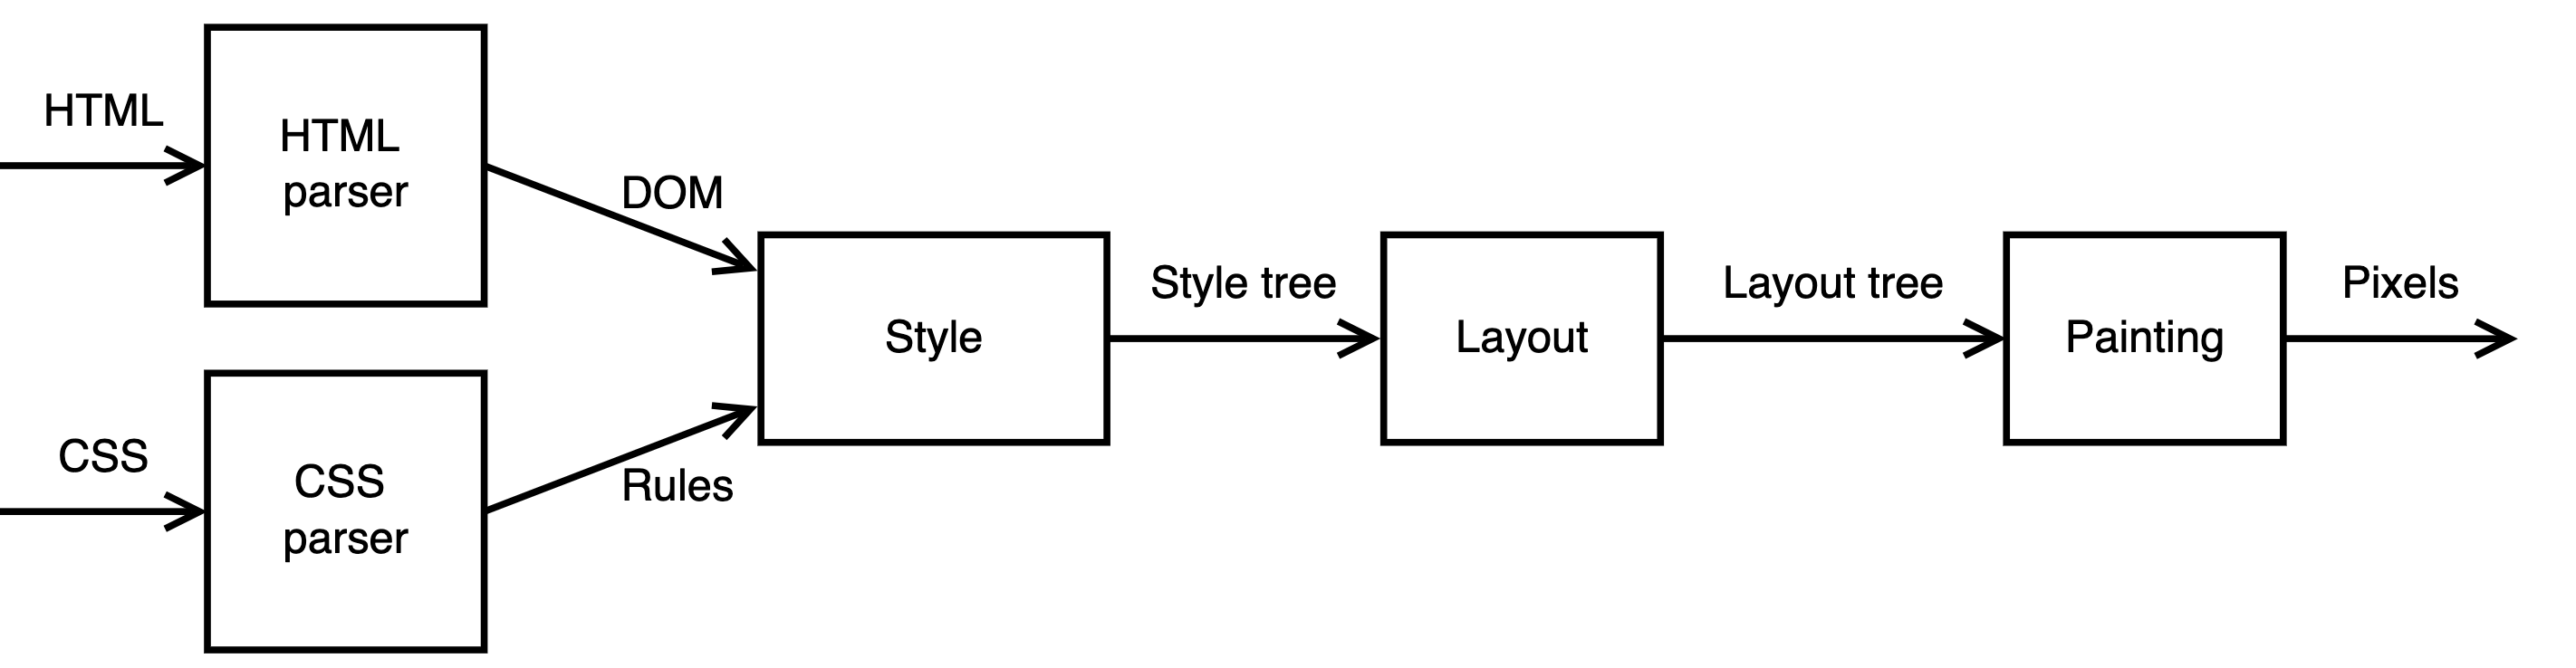
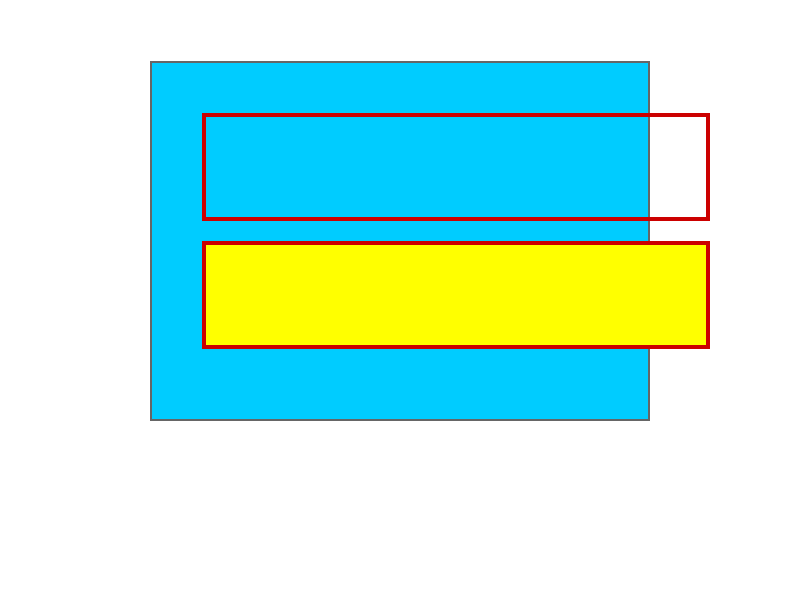
The Style tree is, I believe, what we have been referring to as the Render tree so far. When the following HTML and CSS are loaded into the Toy browser engine (mbrubeck), the output is as shown in the image below.
<html>
  <head>
    <title>Test</title>
  </head>
  <div class="outer">
    <p class="inner">Hello, <span id="name">world!</span></p>
    <p class="inner" id="bye">Goodbye!</p>
  </div>
</html>
* {
  display: block;
}

span {
  display: inline;
}

html {
  width: 600px;
  padding: 10px;
  border-width: 1px;
  margin: auto;
  background: #ffffff;
}

head {
  display: none;
}

.outer {
  background: #00ccff;
  border-color: #666666;
  border-width: 2px;
  margin: 50px;
  padding: 50px;
}

.inner {
  border-color: #cc0000;
  border-width: 4px;
  height: 100px;
  margin-bottom: 20px;
  width: 500px;
}

.inner#bye {
  background: #ffff00;
}

span#name {
  background: red;
  color: white;
}
The homemade browser engine in the following link is said to have been created with reference to mbrubeck/robinson.
- askerry/toy-browser
- Toy browser engine (askerry)
- Made with C++
When the following HTML and CSS are loaded into the Toy browser engine (askerry), the output is as shown in the image below. As you can see, it is very high-functioning.
<html xmlns="http://www.w3.org/1999/xhtml">
  <head>
    <title>Browser Test</title>
    <meta http-equiv="Content-Type" content="text/html; charset=utf-8" />
    <link rel="stylesheet" href="demo.css" />
  </head>

  <body>
    <div id="page">
      <header class="header">
        <h1>Toy Browser Engine</h1>
      </header>
      <div id="main">
        <div id="navbar">
          <a href="#" class="navitem"> Home </a>
          <a href="#" class="navitem"> About </a>
          <a href="#" class="navitem"> Some random stuff </a>
          <a href="#" class="navitem"> Conclusion </a>
          <img class="img" src="images/otters.jpg" />
        </div>
        <div id="content">
          <h2>What is this?</h2>
          This is a <b>toy</b> browser engine, implemented for
          <span>fun </span> <img class="icon" src="images/fun.png" /> and
          <span>glory <img class="icon" src="images/glory.png" /></span>.
          <h2>Why would anyone do this?</h2>
          This seems pretty pointless! But I had a few goals:
          <ul>
            <li>Something to build to learn C++</li>
            <li>Learn more about how browsers work</li>
            <li>Make something I've never made before</li>
          </ul>
          <h2>What can it do?</h2>
          <p>
            Currently, the engine can parse a subset of HTML and build a DOM
            tree. It can also parse a small subset of CSS (sometimes
            incorrectly) and use simple selector matching to apply styles to
            elements.
          </p>
          <p>
            It supports <em>very basic</em> rendering of boxes, images, and text
            with simple block and inline layouts.
          </p>
        </div>
      </div>
    </div>
  </body>
</html>
/* https://github.com/askerry/toy-browser/blob/master/examples/demo.css */
body {
  font-family: Arial, sans-serif;
  background-color: #bfc0c0;
  color: #253237;
  font-size: 16px;
}
#page {
  padding: 20;
  /* width: 800px; */
  margin: auto;
}

header {
  padding: 10px;
  padding-left: 20px;
  background-color: #434371;
  color: #4acebd;
}

span {
  color: #4acebd;
}

#main {
  background-color: white;
  display: flex;
}

#navbar {
  width: 180px;
  padding: 30px;
  background-color: #4acebd;
  height: 500px;
}

.navitem {
  display: block;
  text-align: center;
  background-color: #434371;
  color: #4acebd;
  margin-top: 5px;
  margin-bottom: 5px;
  padding: 10px;
  border-radius: 4px;
  border-style: solid;
  border-width: 2px;
  border-color: #253237;
}

#content {
  padding: 20px;
  width: 500;
}

.img {
  width: 180px;
}

.icon {
  width: 2em;
}

h2 {
  color: #434371;
}

li {
  margin-bottom: 5px;
}

Personally, I am more interested in this one, so I would like to first understand this and then recreate it in Rust.
Learning C++
Now, to learn C++, let's take a quick look at the following sites.
- C++ Introduction - www.asahi-net.or.jp
- C++ Introduction - wisdom.sakura.ne.jp
- C++ Introduction - kaitei.net
Source Code of the Homemade Browser
I will post the main code (main.cc) of askerry/toy-browser.
/* https://github.com/askerry/toy-browser/blob/master/src/main.cc */
namespace {

void renderWindow(int width, int height, const style::StyledNode &sn,
                  sf::RenderWindow *window) {
  layout::Dimensions viewport;
  viewport.content.width = width;
  viewport.content.height = height;
  // Create layout tree for the specified viewport dimensions.
  std::unique_ptr<layout::LayoutElement> layout_root =
      layout::layout_tree(sn, viewport);
  // Paint to window.
  paint(*layout_root, viewport.content, window);
}

int windowLoop(const style::StyledNode &sn) {
  // Create browser window.
  std::unique_ptr<sf::RenderWindow> window(new sf::RenderWindow());
  window->create(sf::VideoMode(FLAGS_window_width, FLAGS_window_height),
                 "Toy Browser", sf::Style::Close | sf::Style::Resize);
  window->setPosition(sf::Vector2i(0, 0));
  window->clear(sf::Color::Black);
  // Render initial window contents.
  renderWindow(FLAGS_window_width, FLAGS_window_height, sn, window.get());
  // Run the main event loop as long as the window is open.
  while (window->isOpen()) {
    sf::Event event;
    while (window->pollEvent(event)) {
      switch (event.type) {
        case sf::Event::Closed:
          window->close();
          break;

        case sf::Event::KeyPressed:
          logger::debug("keypress: " + std::to_string(event.key.code));
          break;

        case sf::Event::Resized:
          logger::debug("new width: " + std::to_string(event.size.width));
          logger::debug("new height: " + std::to_string(event.size.height));
          window->clear(sf::Color::Black);
          renderWindow(event.size.width, event.size.height, sn, window.get());
          break;

        case sf::Event::TextEntered:
          if (event.text.unicode < 128) {
            logger::debug(
                "ASCII character typed: " +
                std::to_string(static_cast<char>(event.text.unicode)));
          }
          break;

        default:
          break;
      }
    }
  }
  return 0;
}
}  // namespace
int main(int argc, char **argv) {
  gflags::ParseCommandLineFlags(&argc, &argv, true);

  // Parse HTML and CSS files.
  const std::string source = io::readFile(FLAGS_html_file);
  std::unique_ptr<dom::Node> root = html_parser::parseHtml(source);
  const std::string css = io::readFile(FLAGS_css_file);
  const std::unique_ptr<css::StyleSheet const> stylesheet = css::parseCss(css);

  // Initialize font registry singleton.
  text_render::FontRegistry *registry =
      text_render::FontRegistry::getInstance();

  // Align styles with DOM nodes.
  std::unique_ptr<style::StyledNode> styled_node =
      style::styleTree(*root, stylesheet, style::PropertyMap());

  // Run main browser window loop.
  windowLoop(*styled_node);

  // Delete styled node and clear font registry.
  styled_node.reset();
  registry->clear();
  return 0;
}
As you can see, the main flow we have learned so far and C++ are very similar.
- Parse HTML and CSS
// Parse HTML and CSS files.
const std::string source = io::readFile(FLAGS_html_file);
std::unique_ptr<dom::Node> root = html_parser::parseHtml(source);
const std::string css = io::readFile(FLAGS_css_file);
const std::unique_ptr<css::StyleSheet const> stylesheet = css::parseCss(css);
- Construct the Style tree (Render tree) from the result of 1
// Align styles with DOM nodes.
std::unique_ptr<style::StyledNode> styled_node =
    style::styleTree(*root, stylesheet, style::PropertyMap());
- Construct a Layout tree from the results of 2
// Create layout tree for the specified viewport dimensions.
std::unique_ptr<layout::LayoutElement> layout_root =
    layout::layout_tree(sn, viewport);
- Paint 3
// Paint to window.
paint(*layout_root, viewport.content, window);
Re: Reading the browser mechanism documentation
I think that if you read How Browsers Work: Behind the scenes of modern web browsers again, you will be able to understand it more deeply than when you first read it.
In conclusion
I have deepened my understanding of browser operations through documentation and self-made.
If you understand how a browser works, I think you can develop a web frontend that is friendly to the browser.
(I might be able to reverse engineer Chromium this time.)
Others
There was a Chromium advent calendar. It would be good to take a quick look for reference. Chromium Browser Advent Calendar 2017

If it was helpful, support me with a ☕!
Share
Related tags
- My First Mobile App Development Attempt and Why I Gave Up
- Things I learned when I started using React at work
- Developing an oEmbed component with WebComponents and what I learned
- Thoughts on Using Ruby on Rails in Business
- Knowing the History Before Learning React
- Writing about what I learned from being infected with the Omicron variant
- Building a TikTok Scraping Infrastructure on GCP and the Challenges Faced
- It's become harder to "ask casually" since remote work started
- What I, an engineer in my late 20s, need to learn from now on
- Everything you need to know about Micro Frontends
- Introducing a Tool for Bulk Updating Account Images and What I Learned
- Everything I Learned About Micro Frontends
- Cotlin is a Tool for Collecting Links on Twitter, Discover Presentations from Around the World
- Why the Combination of FetchAll and RedirectURL in Google Apps Script is Bad
- I tried creating rMinc, a service that registers GMail to GCalendar
- I Tried Making a One-Frame Comic Search Service Tiqav2 (Algolia + Cloudinary + Google Cloud Vision API)
- Sharing All Experiences of First-time Writing at Techbook Fest 7