Comprehensive Testing Pattern Guide for Web Frontend
Hello, I am silverbirder who loves testing. Are you conducting tests on your Web frontend? I believe unit tests and visual regression tests are widely known. However, do you have test codes for performance tests? Also, do you have chaos engineering tests and accessibility tests?
This time, I have researched comprehensive testing patterns for the Web frontend and would like to present the results here. I hope that understanding these will help readers when formulating appropriate testing strategies.
Premise
The subject of the test this time is a TODO app called TodoMVC. We will use React as the framework, but the testing patterns introduced do not depend on the framework. However, please note that the libraries used are related to React. Also, we will use Jest as the testing library.
The reference code is prepared in the following repository, so please refer to it.
https://github.com/silverbirder/react-todoMVC/
Also, the working application is published on Vercel. Please refer to this as well.
https://silverbirder-react-todo-mvc.vercel.app
The structure of the components is as follows.
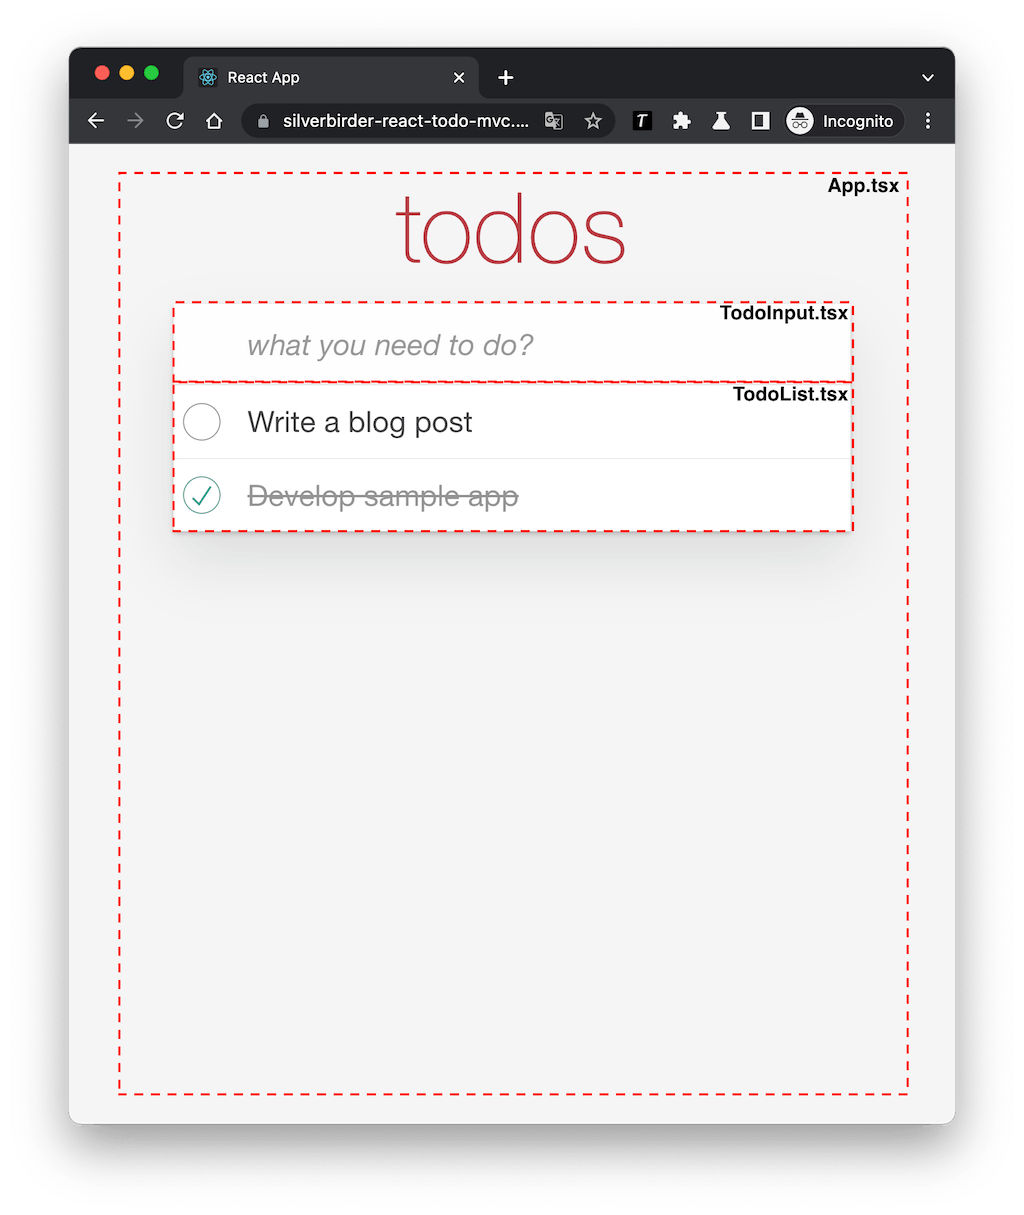
- App.tsx
- TodoInput.tsx
- TodoList.tsx
- TodoItem.tsx
- TodoContext.ts
Overview
First, let's introduce the overall picture of the testing patterns we will introduce.
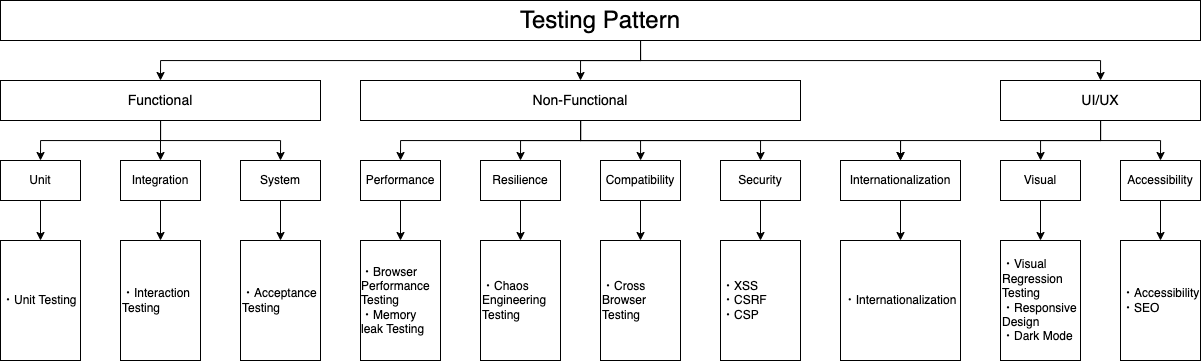
The testing patterns are broadly classified into the following three categories.
- Functional tests
- Non-functional tests
- UI/UX tests
I will explain each of these in detail.
Testing Patterns
Functional Tests
A function refers to tasks or operations performed to achieve a specific purpose provided by a system, software, product, or service. In the context of the Web frontend, functions refer to tasks or operations realized in the user interface (UI) part of the Web application. This includes screen display and operation, page transition and update, etc.
Functional tests are famous for the test trophy and test pyramid. Generally, there are the following three categories.
- Unit tests
- Tests at the individual level, such as functions and components
- Integration tests
- Tests whether multiple functions or components are correctly linked
- E2E (System) tests
- Tests that go straight through from the frontend to the backend
Unit tests and integration tests are tests that are completed on the front-end and prioritize speed. On the other hand, E2E tests are slower and heavier as they collaborate with the back-end, but they test in a state closer to the production environment.
Unit tests are performed for each function or component, while it is recommended to perform integration tests on components combined in a meaningful unit for the user. Page-level components that make up the screen would be appropriate.
Unit Tests
First, let's start with the well-known unit tests. Let's test the TodoItem component.
The TodoItem component is as follows.
// src/components/TodoItem/TodoItem.tsx

import React, { useContext } from "react";
import type { Todo } from "../../types";
import { TodoContext } from "../context";

type Props = {
  todo: Todo;
};

export const TodoItem: React.FC<Props> = ({ todo }) => {
  const { toggle, deleteTodo } = useContext(TodoContext);
  return (
    <li className={todo.completed ? "completed" : ""}>
      <div className="view">
        <input
          className="toggle"
          type="checkbox"
          checked={todo.completed}
          onChange={() => toggle(todo.id)}
        />
        <label data-testid="todo-title">{todo.title}</label>
        <button className="destroy" onClick={() => deleteTodo(todo.id)} />
      </div>
    </li>
  );
};
The test code for this component is as follows.
// src/components/TodoItem/TodoItem.test.tsx

import React from "react";
import { render, screen } from "@testing-library/react";
import { TodoItem } from "./TodoItem";
import { TodoContext } from "../context";
import userEvent from "@testing-library/user-event";

const mockToggle = jest.fn();
const mockDeleteTodo = jest.fn();
const mockAdd = jest.fn();

describe("TodoItem", () => {
  // Arrange
  const mockTodo = {
    id: "1",
    title: "Test Todo",
    completed: false,
  };

  it("renders todo title", () => {
    // Act
    render(
      <TodoContext.Provider
        value={{
          toggle: mockToggle,
          deleteTodo: mockDeleteTodo,
          addTodo: mockAdd,
        }}
      >
        <TodoItem todo={mockTodo} />
      </TodoContext.Provider>
    );

    // Assert
    expect(screen.getByText(mockTodo.title)).toBeInTheDocument();
  });

  it("toggles todo completion", () => {
    // Arrange
    render(
      <TodoContext.Provider
        value={{
          toggle: mockToggle,
          deleteTodo: mockDeleteTodo,
          addTodo: mockAdd,
        }}
      >
        <TodoItem todo={mockTodo} />
      </TodoContext.Provider>
    );

    // Act
    userEvent.click(screen.getByRole("checkbox"));

    // Assert
    expect(mockToggle).toHaveBeenCalledWith(mockTodo.id);
  });

  it("deletes a todo", () => {
    // Arrange
    render(
      <TodoContext.Provider
        value={{
          toggle: mockToggle,
          deleteTodo: mockDeleteTodo,
          addTodo: mockAdd,
        }}
      >
        <TodoItem todo={mockTodo} />
      </TodoContext.Provider>
    );

    // Act
    userEvent.click(screen.getByRole("button"));

    // Assert
    expect(mockDeleteTodo).toHaveBeenCalledWith(mockTodo.id);
  });
});
There is probably no particularly new test code. This time it was test code for the component, but logic files separated from the component (for example, React's hooks) are of course also targets.
When creating unit tests, I pay attention to the following three points.
- Use the Arrange-Act-Assert (AAA) pattern
- Make the structure easy to read from top to bottom
- Do not read back from the bottom
- Write with natural language in mind
- The output message after the test is easy to read
- Make the structure easy to read from top to bottom
- Avoid DRY principles and control statements (if/while, etc.), and write straightforwardly
- Prefer simple and intuitive test code
- Hard-coded variables are also good
- Make sure the content is confirmed in one test file
- For example, do not split the data file into a separate file
- Prefer simple and intuitive test code
- Perform one verification for each test case
- Verification for different purposes is divided into test cases
Digression) Why write test code?
I believe that test code exists for the engineers who develop the product, not for the users who use the product. Therefore, the three purposes of test code that I think are as follows.
- Improve development efficiency (reduce keystrokes)
- Maintain feature quality
- Clarify specifications
In improving development efficiency, for example, in the case of schema validation with many combination patterns, manual confirmation is difficult. Therefore, by conducting parameterized tests and property-based tests, you can develop efficiently.
In maintaining feature quality, run tests in the CI/CD process and build a release flow that deploys only when the test is successful. Then, the deployed product can guarantee the quality of the content described in the test.
In clarifying specifications, by writing test code in easy-to-understand natural language, you can understand what functions are available. It is unkind to read the specification from the product code, but if the test code is easy to understand, you can grasp the current operation of the function to some extent.
Integration Tests
In unit tests, individual components and functions are targeted. On the other hand, in integration tests, things in a state that can provide value to users, such as components that make up one screen, are targeted. In this case, App.tsx using TodoList.tsx and TodoInput.tsx is applicable.
In integration tests, communication with the backend is simulated, but all other elements are real. Unit tests were tests of only one component, but in integration tests, all necessary components are displayed on the screen. Therefore, for the purpose of checking the cooperation between components, it is effective to perform user operations, that is, interaction tests.
For interaction tests, it is convenient to use Storybook.
https://storybook.js.org/docs/react/writing-tests/interaction-testing
Traditionally, I think you were doing interaction tests (clicks, etc.) in the terminal, but by using Storybook, you can create tests while visually confirming, making it very easy to develop.
Now, let's create an interaction test for App.tsx, which is provided as one function. First, when you create a Storybook, you get something like this.
:::message The version of Storybook introduced this time is 6.5. :::
// src/components/App/App.stories.tsx

import { ComponentStoryObj, ComponentMeta } from "@storybook/react";
import { App } from ".";
import { userEvent, within } from "@storybook/testing-library";

type Component = typeof App;
type Meta = ComponentMeta<Component>;
type Story = ComponentStoryObj<Component>;

const meta: Meta = {
  component: App,
};
export default meta;

export const AddTwoTodosAndCheckOneScenario: Story = {
  play: async ({ canvasElement }) => {
    const canvas = within(canvasElement);
    await userEvent.type(canvas.getByRole("textbox"), "Write a blog post", {
      delay: 100,
    });
    await userEvent.keyboard("{enter}", { delay: 100 });
    await userEvent.type(canvas.getByRole("textbox"), "Develop sample app", {
      delay: 100,
    });
    await userEvent.keyboard("{enter}", { delay: 100 });
    await userEvent.click(canvas.getAllByRole("checkbox")[1]);
  },
};
In this way, Storybook allows you to express interactions by writing plays in Stories. You can check the interactions on Storybook.

Now, let's utilize this in testing.
// src/components/App/App.test.tsx

import { render, screen } from "@testing-library/react";
import { composeStories } from "@storybook/testing-react";
import * as stories from "./App.stories";

const { AddTwoTodosAndCheckOneScenario } = composeStories(stories);

describe("play AddTwoTodosAndCheckOneScenario", () => {
  it("renders two todos", async () => {
    // Arrange
    const { container } = render(<AddTwoTodosAndCheckOneScenario />);

    // Act
    await AddTwoTodosAndCheckOneScenario.play({ canvasElement: container });

    // Assert
    const todos = screen.getAllByTestId("todo-title");
    expect(todos).toHaveLength(2);
  });
  it("checks one todo", async () => {
    // Arrange
    const { container } = render(<AddTwoTodosAndCheckOneScenario />);

    // Act
    await AddTwoTodosAndCheckOneScenario.play({ canvasElement: container });

    // Assert
    const todoCheckboxes = screen.getAllByRole("checkbox", { checked: true });
    expect(todoCheckboxes).toHaveLength(1);
  });
});
In this way, you can load the Story object of Storybook into the test code and execute the play function. Therefore, the interactions confirmed in Storybook will work as is in the test code. All you have to do is write expect.
Integration tests can perform many more valuable tests than unit tests. The reason is that it allows for user perspective testing. In unit testing, detailed testing of functions and components is possible, but it is essentially testing from an engineer's perspective.
It's okay to have more integration tests than unit tests. There may be overlapping code between unit tests and integration tests, but perfect minimal comprehensive test maintenance is not realistic, and even if there is overlap, it's okay if it doesn't cause too many problems.
Mocking API Communication
The frontend often triggers communication with the backend. In integration tests and unit tests, it is common to mock API communication. mswjs/msw, which intercepts communication and returns fixed data, is famous. Also, mswjs/data, which can return data dynamically instead of fixed data, is also useful, so I'll introduce it.
https://github.com/mswjs/msw https://github.com/mswjs/data
E2E Testing (System)
Here, we will create a test that includes everything from the frontend to the API. In E2E testing, tests are generally performed using a headless browser. I prefer to use Playwright.
When creating E2E tests, it is desirable to write acceptance tests that check whether the requirements are met from a business perspective, rather than conducting detailed tests from an engineer's perspective. Therefore, I will introduce a sample using the famous cucumber for ATDD.
In cucumber, you write scenarios for acceptance in BDD-style gherkin. Also, gherkin can be created in markdown.
Now, let's create a simple acceptance test scenario. The scenario will be as follows.
# Feature: Todo App

## Background: The Todo App is opened

- Given the Todo App is opened

## Rule: Adding new Todos

### Scenario: Add a new Todo

- When the user enters a "new Todo" and enter key
- Then the "new Todo" is added to the list

### Scenario: Attempt to add an empty Todo

- When the user enters an empty Todo and clicks the Add button
- Then the Todo is not added to the list and "Not entered" message is displayed
Let's create test code based on this scenario. Write the test code as follows. World is just launching a headless browser using Playwright.
// features/step_definitions/steps.ts

import { Given, When, Then } from "@cucumber/cucumber";
import World from "../support/World";
import assert from "assert";

Given("the Todo App is opened", async function (this: World) {
  await this.page.goto("https://silverbirder-react-todo-mvc.vercel.app");
});

When(
  "the user enters a {string} and enter key",
  async function (this: World, todo: string) {
    const todoInput = await this.page.getByPlaceholder("what you need to do?");
    await todoInput.type(todo);
    await this.page.keyboard.down("Enter");
  }
);

Then(
  "the {string} is added to the list",
  async function (this: World, todo: string) {
    const todos = await this.page.getByText(todo);
    assert((await todos.count()) === 1);
  }
);

When(
  "the user enters an empty Todo and clicks the Add button",
  async function (this: World) {
    const todoInput = await this.page.getByPlaceholder("what you need to do?");
    await todoInput.focus();
    await this.page.keyboard.down("Enter");
  }
);

Then(
  "the Todo is not added to the list and {string} message is displayed",
  async function (this: World, message: string) {
    const todos = await this.page.getByTestId("todo-title");
    assert((await todos.count()) === 0);
    const messages = await this.page.getByText(message);
    assert((await messages.count()) === 1);
  }
);
When you run cucumber-js, the test is executed based on the scenario.
$ npx cucumber-js
..........
2 scenarios (2 passed)
6 steps (6 passed)
0m02.504s (executing steps: 0m02.476s)
By conducting this test before release, the content described in the scenario is guaranteed. Please consider conducting acceptance tests before release.
※ I would like to talk about the Actor, Task, and World, which are called the Screenplay pattern, but I will omit it this time because there is a lot of information.
Non-Functional Testing
Just as performance tests are conducted on machine resources in the backend, performance tests are also conducted on browsers in the frontend. Performance is one of the non-functional requirements. The non-functional requirements to be introduced are as follows.
- Performance
- Resilience
- Mutation
- Compatibility
Security
Performance
In frontend development, it is inevitable to face performance issues. When a performance issue occurs, performance tuning is typically performed. DevTool and profilers are used to identify the problem and seek a solution.
However, it would be a waste to just solve the problem. It would be even better if there were test codes related to performance to prevent the same problem from recurring.
Profiler
In React, a tool called Profiler is provided, and by combining it with Jest, effective testing is possible.
https://ja.reactjs.org/docs/profiler.html
For example, you can create a test to confirm that the rendering time when 100 Todos of TodoList are rendered is less than 200ms.
// src/components/TodoList/TodoList.perf.test.tsx

import { render } from "@testing-library/react";
import { TodoList } from ".";
import { Todo } from "../../types";
import { Profiler } from "react";

describe("TodoList", () => {
  it("renders with acceptable performance", () => {
    // Arrange
    const onRender = jest.fn();
    const todos: Todo[] = [...Array(100)].map((value, index) => {
      return {
        id: index.toString(),
        title: "title",
        completed: false,
      };
    });

    // Act
    render(
      <Profiler id="PerformanceTestComponent" onRender={onRender}>
        <TodoList todos={todos} />
      </Profiler>
    );

    // Assert
    const [, , actualDuration, , , , ,] = onRender.mock.calls[0];
    expect(actualDuration).toBeLessThan(200);
  });
});
This is a simple example, but in reality, more complex operations may be required. After performance tuning, make sure that requirements such as rendering time are guaranteed.
PerformanceObserver
If the recalculation of the layout (reflow) is forcibly executed, the JS execution time on the browser's main thread may continue for a long time. This can delay the rendering speed and reduce the frame rate (fps).
To address this issue, you can create test code using the PerformanceLongTaskTiming metric, which is still an experimental feature in the Performance API.
You can refer to detailed information about the Performance API and PerformanceLongTaskTiming at the following links.
- https://developer.mozilla.org/ja/docs/Web/API/Performance_API
- https://developer.mozilla.org/ja/docs/Web/API/PerformanceLongTaskTiming
Let's create a test code specifically. Let's use @playwright/test.
import { test, expect } from "@playwright/test";

test("no long tasks after button click", async ({ page }) => {
  // Navigate to the specified URL
  await page.goto(
    "https://googlesamples.github.io/web-fundamentals/tools/chrome-devtools/rendering-tools/forcedsync.html"
  );

  // Define a function to observe long tasks
  const observeLongTasks = async (): Promise<number> => {
    return await page.evaluate(() => {
      return new Promise<number>((resolve) => {
        let longTaskCount = 0;

        // Create a PerformanceObserver to observe long tasks
        const observer = new PerformanceObserver((entryList) => {
          for (const entry of entryList.getEntries()) {
            if (entry.entryType === "longtask") {
              longTaskCount++;
            }
          }
        });

        // Start observing long tasks
        observer.observe({ entryTypes: ["longtask"] });

        // Click the button
        const button = document.querySelector("button");
        button.click();

        // Wait for a short time to allow long tasks to be recorded
        setTimeout(() => {
          // Stop observing and resolve the promise with the count of long tasks
          observer.disconnect();
          resolve(longTaskCount);
        }, 3000);
      });
    });
  };

  // Observe long tasks after clicking the button
  const longTaskCount = await observeLongTasks();

  // Expect no long tasks to occur
  expect(longTaskCount).toBe(0);
});
You can run the test using the following command.
$ npx playwright test
This test code guarantees that longTasks do not occur.
LongTasks target tasks that exceed 50ms (reference). Other metrics include paint and layout-shift. You can check the list of metrics at this link.
Memory Leak
In the case of frontends like SPAs, memory leaks may be a concern. To address this issue, a tool called Memlab developed by Meta is useful. Memlab launches Puppeteer, performs screen operations, and takes a snapshot of heap memory in V8.
Here, I will introduce a simple test code using Memlab.
// .memlab/scenario.js

// initial page load's url
function url() {
  return "https://silverbirder-react-todo-mvc.vercel.app";
}

// action where you suspect the memory leak might be happening
async function action(page) {
  await page.type(".new-todo", "Hello World");
  await page.keyboard.press("Enter");
}

// how to go back to the state before action
async function back(page) {
  await page.hover(".view");
  await page.click(".destroy");
}

module.exports = { action, back, url };
url is access to the base URL and monitors memory usage. In action, describe operations that are likely to cause memory leaks, and in back, perform operations to return to the original state.
The execution of Memlab is as follows.
$ memlab run --scenario .memlab/scenario.js
page-load[1.4MB](baseline)[s1] > action-on-page[1.6MB](target)[s2] > revert[1.8MB](final)[s3]

total time: 49.2s
Memory usage across all steps:
2.1 _________
1.9 _________
1.8 _________
1.7 ______▄▄_
1.5 ___▄▄_▄▄_
1.4 ___▄▄_▄▄_
1.3 ▄▄_▄▄_▄▄_
1.1 ▄▄_▄▄_▄▄_
1.0 ▄▄_▄▄_▄▄_
    1  2  3

No leaks found
MemLab found 0 leak(s)
✨  Done in 51.69s.
Resilience
Chaos engineering tests can also be conducted on the frontend.
https://www.npmjs.com/package/chaos-frontend-toolkit
Browser operations vary by user. For example, there are browser operations like the following:
- Free browser back and mouse, keyboard operations
- Double click instead of single click
Furthermore, it is common for browsers to communicate with the outside world. Regarding the network, situations like the following can occur:
- Failure or delay of requests
- Blocking of requests common under proxy environments
It might be beneficial to write tests to ensure that the application does not crash even when such chaos is injected.
For example, the code to generate random clicks on Storybook would be as follows:
// src/components/App/App.stories.tsx
import { ComponentStoryObj, ComponentMeta } from "@storybook/react";
import { App } from ".";
import chaosFrontendToolkit from "chaos-frontend-toolkit";

type Component = typeof App;
type Meta = ComponentMeta<Component>;
type Story = ComponentStoryObj<Component>;

const meta: Meta = {
  component: App,
};
export default meta;

export const Monkey: Story = {
  decorators: [
    (Story) => {
      chaosFrontendToolkit.gremlins.start();
      return <Story />;
    },
  ],
};
After that, it would be good to write test code to monitor console.error and confirm that it does not occur. However, if an error is detected, it is difficult to solve the problem if it cannot be reproduced, so it is necessary to leave a traceable log in some way or to record it like a session replay (it would be even better if there is a seed value).
Mutation
There is a method called mutation testing.
This is not in the context of frontend, but I thought it was interesting so I'll introduce it. (laughs)
Stryker expects the test code to fail when rewriting (mutating) the production code. In other words, it's like testing the test code. This allows you to see through false test coverage. Setting up Stryker is as simple as following the official page and running stryker run. Let's actually run it.
$ stryker run
INFO ProjectReader Found 4 of 63 file(s) to be mutated.
INFO Instrumenter Instrumented 4 source file(s) with 47 mutant(s)
INFO ConcurrencyTokenProvider Creating 2 checker process(es) and 2 test runner process(es).
INFO DryRunExecutor Starting initial test run (jest test runner with "off" coverage analysis). This may take a while.
INFO DryRunExecutor Initial test run succeeded. Ran 8 tests in 20 seconds (net 8004 ms, overhead 12326 ms).
Mutation testing  [=========================================] 100% (elapsed: ~2m, remaining: n/a) 47/47 Mutants tested (21 survived, 0 timed out)

All tests
  ...
  TodoItem/TodoItem.test.tsx
    ✘ TodoItem renders todo title [line 18] (covered 0)
    ✘ TodoItem toggles todo completion [line 30] (covered 0)
    ✓ TodoItem deletes a todo [line 45] (killed 1)
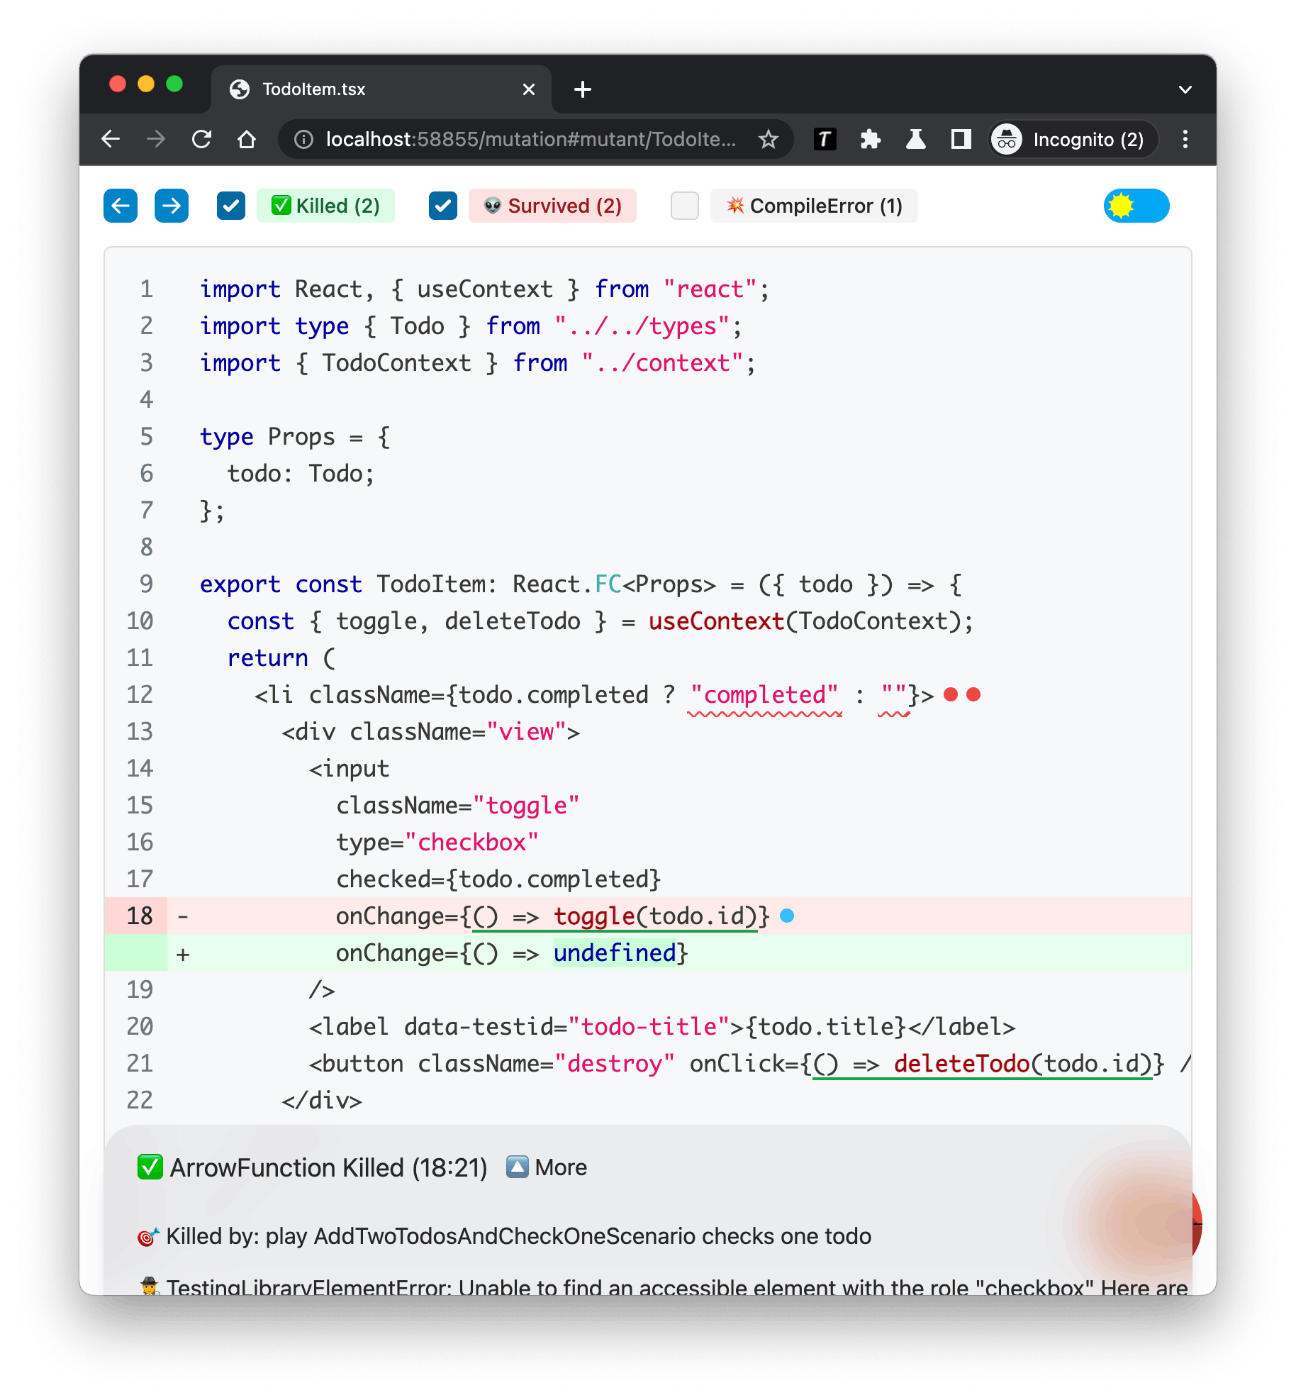
In TodoItem, the mutants (👽) that destroyed the product code and the corresponding tests that failed (Killed) are as shown in the following image.
On the other hand, an example of a mutant that survived is, for example, the className part.
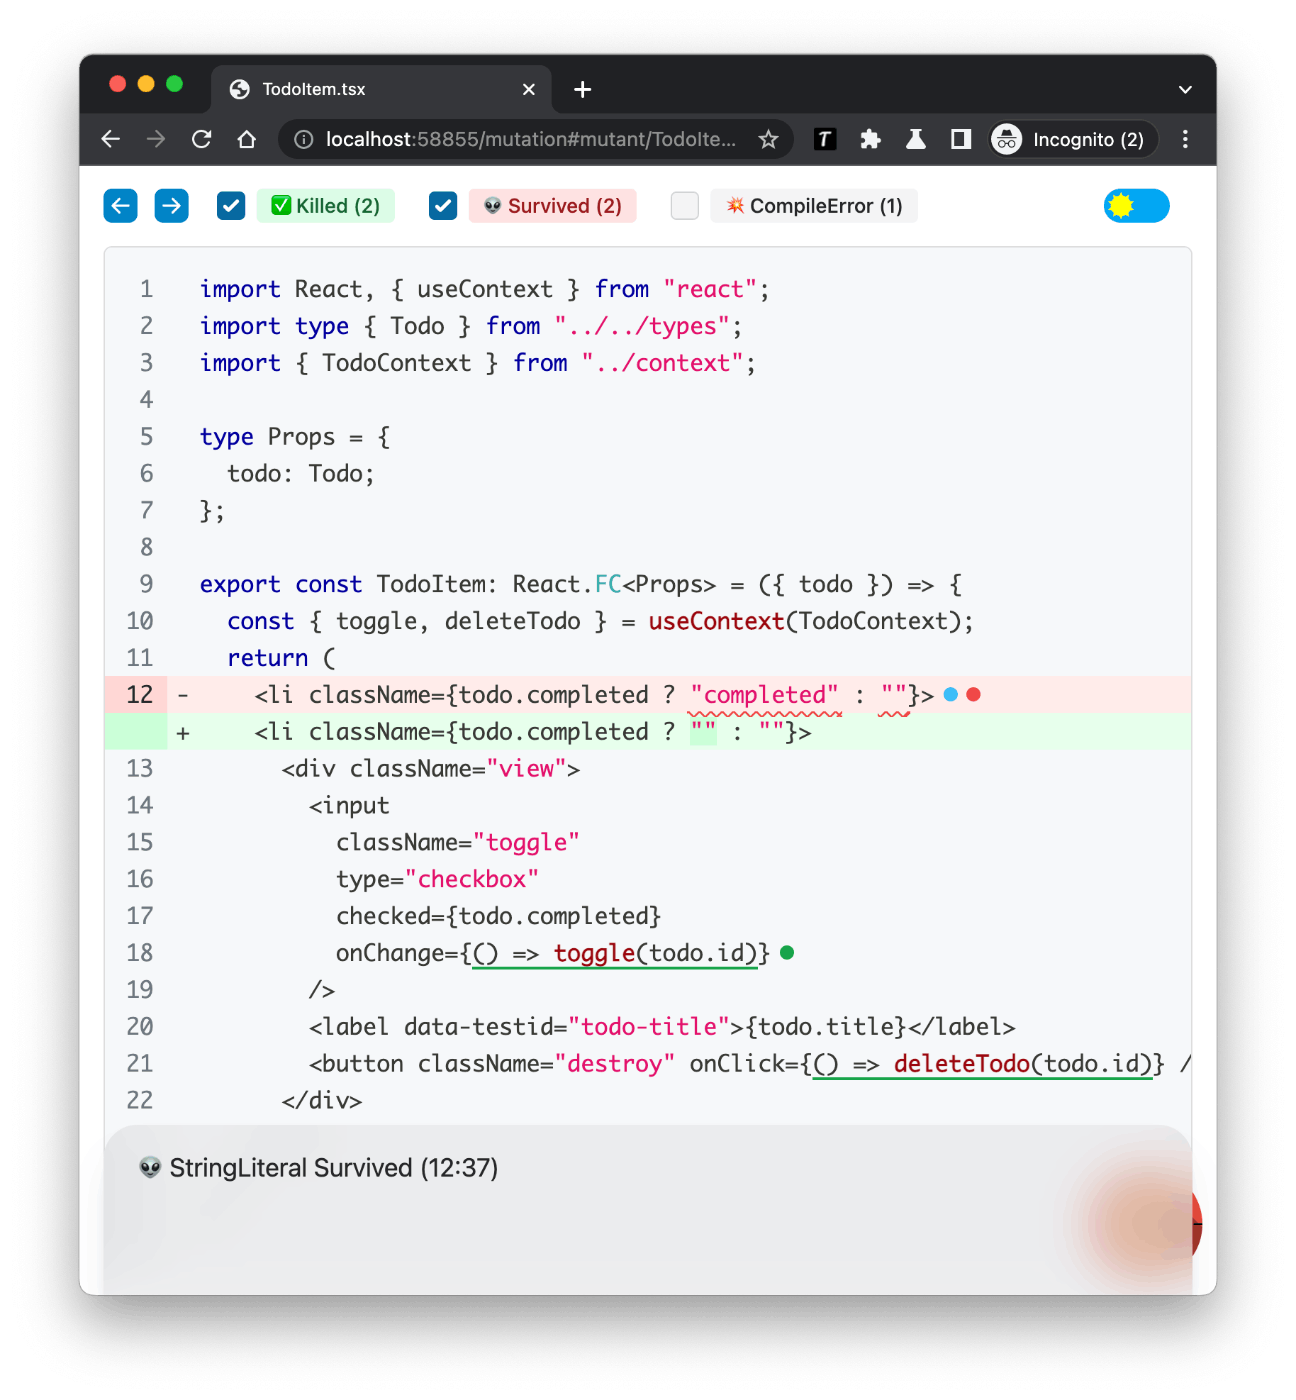
Since className affects the appearance, you would want to detect it in the visual regression test mentioned later.
In this way, finding mutants and improving the quality of tests can be considered as one of the effective means.
Compatibility
In frontend development, it is necessary to check the operation on the supported browsers. Because each browser has different JavaScript engines and rendering engines, it is necessary to check the behavior and appearance of JavaScript on each browser.
There are various methods for cross-browser testing, such as purchasing actual machines, using virtual servers, utilizing SaaS like BrowserStack, and using multiple browsers with Playwright. It is important to make a cost-effective choice.
UI/UX
UI/UX is an important theme that cannot be separated from frontend development. This time, I will introduce only a very small part that can be automated for testing. The scope of UI/UX is a field where human judgment is often required, so there is not much content to write.
Visual
Appearance is a very important element unique to the front-end. It is also important to test changes in appearance, such as responsive design, desktop/mobile devices, OS such as Windows/Mac, and features related to the appearance of browsers (dark mode). Let's incorporate a method called visual regression testing into the development cycle. There are various means such as Lost Pixel and Chromatic, so please try them.
https://storybook.js.org/docs/react/writing-tests/visual-testing
Accessibility
In terms of accessibility, there are cases where human judgment is necessary, but there are also elements that can be checked mechanically. Interaction tests are necessary to check whether the function works properly with keyboard operation only. How is the support status of VoiceOver? Furthermore, is the alt attribute of the image set appropriately? Human eyes are needed to judge the expression of sentences, but at least you can check whether it is entered.
https://storybook.js.org/docs/react/writing-tests/accessibility-testing
Others
Don't you want to know comprehensively as a test perspective? I have created my own point of view. This is a list of various perspectives. It's fun to find something inspiring from this list.
For example, consider the following:
- Precision
- Do the backend numbers fall within the range of the frontend numbers?
- The maximum value of a JavaScript Integer is 9,007,199,254,740,991.
- Fault tolerance
- Are you separating core data references and auxiliary data references from the front end?
- Even if the auxiliary data reference fails, it would be good if the application can operate.
Conclusion
How was it? I think there are still many test patterns in the front end. If you know any others, please let me know.

If it was helpful, support me with a ☕!
Share
Related tags
- Trying Out container-structure-test on a Docker Image
- Integration Testing for Next.js and DB using Testcontainers
- Trying Million Lint
- Trying the Playwright Component Test
- I want to do Document Testing with Typescript
- How to Mock tRPC Communication on Storybook with MSW
- E2E Testing with Cucumber and Screenplay Design
- Mockable unit testing methodology completed only with BigQuery
- Trying ArchUnit with Typescript
- Investigated and Summarized Testing Perspectives for Web Apps (25 Selections)
- I want to test with Google Apps Script too! (Clasp + Typescript + Jest)
- Things to Keep in Mind When Writing Unit Tests
- Continuously Monitor Visual Regression Tests with CircleCI + BackstopJS (Puppeteer)