Starting to Learn Kubernetes a Step Behind - 09. discovery&LB Part 2 -
Story
- Starting to Learn Kubernetes a Step Behind - 01. Environment Selection -
- Starting to Learn Kubernetes a Step Behind - 02. Docker For Mac -
- Starting to Learn Kubernetes a Step Behind - 03. Raspberry Pi -
- Starting to Learn Kubernetes a Step Behind - 04. kubectl -
- Starting to Learn Kubernetes a Step Behind - 05. workloads Part 1 -
- Starting to Learn Kubernetes a Step Behind - 06. workloads Part 2 -
- Starting to Learn Kubernetes a Step Behind - 07. workloads Part 3 -
- Starting to Learn Kubernetes a Step Behind - 08. discovery&LB Part 1 -
- Starting to Learn Kubernetes a Step Behind - 09. discovery&LB Part 2 -
- Starting to Learn Kubernetes a Step Behind - 10. config&storage Part 1 -
- Starting to Learn Kubernetes a Step Behind - 11. config&storage Part 2 -
- Starting to Learn Kubernetes a Step Behind - 12. Resource Limitations -
- Starting to Learn Kubernetes a Step Behind - 13. Health Checks and Container Lifecycle -
- Starting to Learn Kubernetes a Step Behind - 14. Scheduling -
- Starting to Learn Kubernetes a Step Behind - 15. Security -
- Starting to Learn Kubernetes a Step Behind - 16. Components -
Last time
We learned about the overview of Service in Starting to learn Kubernetes a step behind - 08. discovery&LB Part 1 -. This time, we will learn all of the following at once:
- ExternalIP
- NodePort
- LocadBalancer
- Headless
- ExternalName
- None-Selector
- Ingress
※ I skipped ClusterIP because I thought the content used last time was sufficient.
ExternalIP
This assigns an outward-facing IP address.
# sample-externalip.yaml
apiVersion: v1
kind: Service
metadata:
  name: sample-externalip
spec:
  type: ClusterIP
  externalIPs:
    - 192.168.3.33
  ports:
    - name: "http-port"
      protocol: "TCP"
      port: 8080
      targetPort: 80
  selector:
    app: sample-app
In my Node information, the status is as follows:
| host | ip |
|---|---|
| raspi001(master) | 192.168.3.32 |
| raspi002(worker) | 192.168.3.33 |
| raspi003(worker) | 192.168.3.34 |
| nfspi(NFS) | 192.168.3.35 |
Here, in spec.externalIPs, set the IP address you want to publish from the above Node's IP address. This time, I set it to only one (raspi002:193.168.3.33).
# sample-deployment.yaml
apiVersion: apps/v1
kind: Deployment
metadata:
  name: sample-deployment
spec:
  replicas: 3
  selector:
    matchLabels:
      app: sample-app
  template:
    metadata:
      labels:
        app: sample-app
    spec:
      containers:
        - name: nginx-container
          image: nginx:1.12
          ports:
            - containerPort: 80
        - name: redis-container
          image: redis:3.2
Prepare a file similar to last time.
pi@raspi001:~/tmp $ k apply -f sample-deployment.yaml -f sample-externalip.yaml
pi@raspi001:~/tmp $ k get pod -o=wide
NAME                                      READY   STATUS    RESTARTS   AGE   IP            NODE       NOMINATED NODE   READINESS GATES
sample-deployment-9dc487867-7n2sz         2/2     Running   0          16m   10.244.1.73   raspi002   <none>           <none>
sample-deployment-9dc487867-nnnqm         2/2     Running   0          16m   10.244.1.74   raspi002   <none>           <none>
sample-deployment-9dc487867-qfdhw         2/2     Running   0          16m   10.244.2.68   raspi003   <none>           <none>
pi@raspi001:~/tmp $ k get service
NAME                TYPE        CLUSTER-IP       EXTERNAL-IP    PORT(S)    AGE
sample-externalip   ClusterIP   10.104.170.220   192.168.3.33   8080/TCP   15m
The externalIP has been set.
pi@raspi001:~/tmp $ for PODNAME in `k get pods -l app=sample-app -o jsonpath='{.items[*].metadata.name}'`; do k exec -it ${PODNAME} -- cp /etc/hostname /usr/share/nginx/html/index.html; done
To make it easy to understand which pod it is, rewrite index.html. Now, let's access it from the browser.

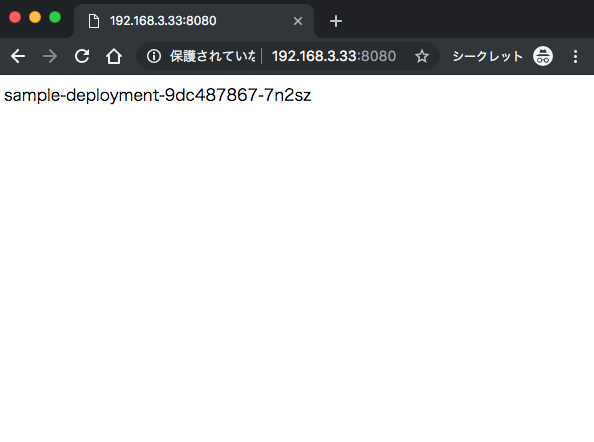
Since I published raspi002, you can see that the Pod existing on that Node is randomly output, in other words, the load balancer is working.
NodePort
Unlike ExternalIP, which publishes a specific Node, NodePort publishes all Nodes.
Let's try it.
# sample-nodeport.yaml
apiVersion: v1
kind: Service
metadata:
  name: sample-nodeport
spec:
  type: NodePort
  ports:
    - name: "http-port"
      protocol: "TCP"
      port: 8080
      targetPort: 80
      nodePort: 30080
  selector:
    app: sample-app
pi@raspi001:~/tmp $ k delete -f sample-externalip.yaml #しなくても良い
pi@raspi001:~/tmp $ k apply -f sample-nodeport.yaml
pi@raspi001:~/tmp $ k get service
NAME              TYPE        CLUSTER-IP      EXTERNAL-IP   PORT(S)          AGE
sample-nodeport   NodePort    10.96.173.243   <none>        8080:30080/TCP   66s
You can access it internally at 10.96.173.243:8080, and externally at each Node's IP address:30080. Both are accessible normally. Of course, the destination Pod is load balanced. It can also handle cases where you don't want to load balance. If you set "spec.externalTrafficPolicy: Local", only the Pod in that Node will be accessed by the accessed Node. Please note that the range of nodePort is fixed from 30000 to 32767.
LoadBalancer
In the case of ExternalIP or NodePort, the load balancing is done by the Nodes within the cluster. Therefore, it seems that a single Node failure is likely to occur due to concentrated access. Therefore, by using LoadBalancer, we create a load balancer outside the cluster.
However, when creating a load balancer outside the cluster, it is necessary to check whether it is supported by the platform. In my raspberryPi environment, of course, such a function does not exist, so it needs to be prepared.
Move to master(raspi001)
pi@raspi001:~/tmp $ k apply -f https://raw.githubusercontent.com/google/metallb/v0.7.3/manifests/metallb.yaml
Apply a load balancer called metallb.
MetalLB is a load-balancer implementation for bare metal Kubernetes clusters, using standard routing protocols.
# l2-config.yaml
apiVersion: v1
kind: ConfigMap
metadata:
  namespace: metallb-system
  name: config
data:
  config: |
    address-pools:
    - name: default
      protocol: layer2
      addresses:
      - 192.168.3.100-192.168.3.200
pi@raspi001:~/tmp $ k apply -f l2-config.yaml
Now, even in the raspberryPi environment, you can use the loadBalancer. Let's try it right away.
# sample-lb.yaml
apiVersion: v1
kind: Service
metadata:
  name: sample-lb
spec:
  type: LoadBalancer
  loadBalancerIP: 192.168.3.100
  ports:
    - name: "http-port"
      protocol: "TCP"
      port: 8080
      targetPort: 80
      nodePort: 30082
  selector:
    app: sample-app
  loadBalancerSourceRanges:
    - 192.168.3.0/8
pi@raspi001:~/tmp $ k apply -f sample-deployment.yaml
pi@raspi001:~/tmp $ k apply -f sample-lb.yaml
pi@raspi001:~/tmp $ k get services
NAME         TYPE           CLUSTER-IP      EXTERNAL-IP     PORT(S)          AGE
kubernetes   ClusterIP      10.96.0.1       <none>          443/TCP          16d
sample-lb    LoadBalancer   10.106.253.65   192.168.3.100   8080:30082/TCP   8m4s
Oh, it seems that you can access 192.168.3.100:8080.
Move to iMac
~ $ curl -s http://192.168.3.100:8080
<!DOCTYPE html>
...
OK
Headless
Unlike the previous load balancing, no public IP address is provided. You can get the IP address of the destination Pod by DNS round robin. In other words, when you query a Headless service, you can get the IP address of the Pod registered with spec.selector. It's convenient when you want the IP address of a Pod. (Like Envoy?)
# sample-statefulset-headless.yaml
apiVersion: apps/v1
kind: StatefulSet
metadata:
  name: sample-statefulset-headless
spec:
  serviceName: sample-headless
  replicas: 3
  selector:
    matchLabels:
      app: sample-app
  template:
    metadata:
      labels:
        app: sample-app
    spec:
      containers:
        - name: nginx-container
          image: nginx:1.12
# sample-headless.yaml
apiVersion: v1
kind: Service
metadata:
  name: sample-headless
spec:
  type: ClusterIP
  clusterIP: None
  ports:
    - name: "http-port"
      protocol: "TCP"
      port: 80
      targetPort: 80
  selector:
    app: sample-app
It is called a Headless Service because spec.type is ClusterIP, spec.clusterIP is None, and metadata.name is the same as spec.serviceName of statefulset.
pi@raspi001:~/tmp $ k apply -f sample-statefulset-headless.yaml
pi@raspi001:~/tmp $ k run --image=centos:7 --restart=Never --rm -i testpod  -- dig sample-headless.default.svc.cluster.local
...
;; ANSWER SECTION:
sample-headless.default.svc.cluster.local. 5 IN	A 10.244.1.75
sample-headless.default.svc.cluster.local. 5 IN	A 10.244.2.72
sample-headless.default.svc.cluster.local. 5 IN	A 10.244.2.73
sample-headless.default.svc.cluster.local. 5 IN	A 10.244.1.78
sample-headless.default.svc.cluster.local. 5 IN	A 10.244.1.76
sample-headless.default.svc.cluster.local. 5 IN	A 10.244.2.70
Indeed, when I queried the headless service, I got an IP address.
ExternalName
This is a service that returns a CNAME for an external domain. For example, if you want to access example.com from a Pod, you set it as follows.
# sample-externalname.yaml
kind: Service
apiVersion: v1
metadata:
  name: sample-externalname
  namespace: default
spec:
  type: ExternalName
  externalName: example.com
pi@raspi001:~/tmp $ k apply -f sample-externalname.yaml
pi@raspi001:~/tmp $ k run --image=centos:7 --restart=Never --rm -i testpod  -- dig sample-externalname.default.svc.cluster.local
...
;; ANSWER SECTION:
sample-externalname.default.svc.cluster.local. 5 IN CNAME example.com.
example.com.		5	IN	A	93.184.216.34
Indeed, by querying sample-externalname.default.svc.cluster.local, you can get a CNAME for the external example.com. Also, when you want to switch to an external site, you only need to change spec.externalName of sample-externalname.yaml, and the query destination remains unchanged. This makes switching easy.
None-Selector
It load balances for external services.
# sample-none-selector.yaml
---
kind: Service
apiVersion: v1
metadata:
  name: sample-none-selector
spec:
  type: ClusterIP
  ports:
    - protocol: TCP
      port: 8080
      targetPort: 80
---
kind: Endpoints
apiVersion: v1
metadata:
  name: sample-none-selector
subsets:
  - addresses:
      - ip: 172.217.31.164
      - ip: 172.217.31.165
    ports:
      - protocol: TCP
        port: 80
Both 172.217.31.164 and 172.217.31.165 point to www.google.com.
pi@raspi001:~/tmp $ k apply -f sample-none-selector.yaml
pi@raspi001:~/tmp $ k get service
NAME                   TYPE           CLUSTER-IP      EXTERNAL-IP     PORT(S)          AGE
sample-none-selector   ClusterIP      10.102.225.99   <none>          8080/TCP         88s
pi@raspi001:~/tmp $ k describe svc sample-none-selector
Name:              sample-none-selector
...
Type:              ClusterIP
IP:                10.102.225.99
Port:              <unset>  8080/TCP
TargetPort:        80/TCP
Endpoints:         172.217.31.164:80,172.217.31.165:80
...
It's a ClusterIP, so it's published internally.
pi@raspi001:~/tmp $ curl 10.102.225.99:8080
<HTML><HEAD><meta http-equiv="content-type" content="text/html;charset=utf-8">
<TITLE>301 Moved</TITLE></HEAD><BODY>
<H1>301 Moved</H1>
The document has moved
<A HREF="http://www.google.com:8080/">here</A>.
</BODY></HTML>
...
The result was a bit unnatural, but it certainly accessed google.com. Load balancing to external services can also be easily achieved.
※ If you access 172.217.31.164, you will be redirected. Status Code: 301
Ingress
The load balancers we've used so far are l4 layer load balancers. (Load balancing by IP address and port number) Ingress provides an l7 layer load balancer. (Load balancing is possible with URL and HTTP headers)
There are two places to put Ingress, inside and outside the cluster. If it's outside the cluster, it depends on the platform you use. If it's inside the cluster, you can use Nginx Ingress.
In a raspberryPi environment, it seems that you can use Ingress by using Ingress-Nginx-Controller. I tried to proceed with reference to NGINX Ingress Controller - Installation Guide, but it did not work in the arm64 environment.
So, I found the following yaml and it works when I tried it. Please give it a try. hectcastro/mandatory.yaml
※ If you cannot delete the namespace, please refer to here.
Cleaning up
pi@raspi001:~/tmp $ k delete -f sample-externalip.yaml -f sample-deployment.yaml -f sample-nodeport.yaml -f sample-lb.yaml -f sample-statefulset-headless.yaml -f sample-headless.yaml -f sample-none-selector.yaml -f sample-externalname.yaml
Finally
We learned about Service. We learned how to publish endpoints according to various purposes. Moving my hands and checking it deepened my understanding. I have no experience using k8s in production, but when I am forced to need it in the future, I will recall this article.
The next one is here.

If it was helpful, support me with a ☕!
Share
Related tags
- Cloud Native Days Tokyo 2019 - Participation Report for July 22-23, 2019
- Starting to Learn Kubernetes a Step Behind - 16. Components -
- Starting to Learn Kubernetes a Step Behind - 15. Security -
- Starting to Learn Kubernetes a Step Behind - 14. Scheduling -
- Osaka, Umeda - Participation Report for Kubernetes Meetup Tokyo 19 Osaka Satellite - May 31, 2019
- Starting to Learn Kubernetes a Step Behind - 13. Health Checks and Container Lifecycle -
- Starting to Learn Kubernetes a Step Behind - 12. Resource Limits -
- Starting to Learn Kubernetes a Step Behind - 11. config&storage Part 2 -
- Starting to Learn Kubernetes a Step Behind - 10. config&storage Part 1 -
- Osaka BMXUG Study Meeting -Kubernates Experience & Watson Discovery Introduction- Participation Report on March 27, 2019
- Starting to Learn Kubernetes a Step Behind - 08. discovery&LB Part 1 -
- Starting to Learn Kubernetes a Step Behind - 07. Workloads Part 3 -
- Starting to Learn Kubernetes a Step Behind - 06. Workloads Part 2 -
- Starting to Learn Kubernetes a Step Behind - 05. workloads Part 1 -
- Starting to Learn Kubernetes a Step Behind - 04. kubectl -
- Starting to Learn Kubernetes a Step Behind - 03. Raspberry Pi -
- Starting to Learn Kubernetes a Step Behind - 02. Docker For Mac -
- Starting to Learn Kubernetes a Step Behind - 01. Choosing the Environment -