Starting to Learn Kubernetes a Step Behind - 02. Docker For Mac -
Story
- Starting to Learn Kubernetes a Step Behind - 01. Environment Selection -
- Starting to Learn Kubernetes a Step Behind - 02. Docker For Mac -
- Starting to Learn Kubernetes a Step Behind - 03. Raspberry Pi -
- Starting to Learn Kubernetes a Step Behind - 04. kubectl -
- Starting to Learn Kubernetes a Step Behind - 05. workloads Part 1 -
- Starting to Learn Kubernetes a Step Behind - 06. workloads Part 2 -
- Starting to Learn Kubernetes a Step Behind - 07. workloads Part 3 -
- Starting to Learn Kubernetes a Step Behind - 08. discovery&LB Part 1 -
- Starting to Learn Kubernetes a Step Behind - 09. discovery&LB Part 2 -
- Starting to Learn Kubernetes a Step Behind - 10. config&storage Part 1 -
- Starting to Learn Kubernetes a Step Behind - 11. config&storage Part 2 -
- Starting to Learn Kubernetes a Step Behind - 12. Resource Limit -
- Starting to Learn Kubernetes a Step Behind - 13. Health Check and Container Lifecycle -
- Starting to Learn Kubernetes a Step Behind - 14. Scheduling -
- Starting to Learn Kubernetes a Step Behind - 15. Security -
- Starting to Learn Kubernetes a Step Behind - 16. Components -
Last time
In Starting to learn Kubernetes a step behind - 01. Environment Selection -, we considered the environment for learning Kubernetes. Instead of using GKE right away, we decided to use DockerForMac, which is easy to try.
Trying Docker For Mac
Environment
# Machine
iMac (21.5-inch, 2017)
# Docker
Docker Community Edition:
  Version: 18.06.1-ce-mac73 (26764)
Docker Engine:
  Version: 18.06.1-ce
Kubernetes:
  Version: v1.10.3
Practice
Let's use it right away. (Referenced from Introduction to Kubernetes)
~ $ kubectl get componentstatuses
NAME                 STATUS    MESSAGE              ERROR
controller-manager   Healthy   ok
scheduler            Healthy   ok
etcd-0               Healthy   {"health": "true"}
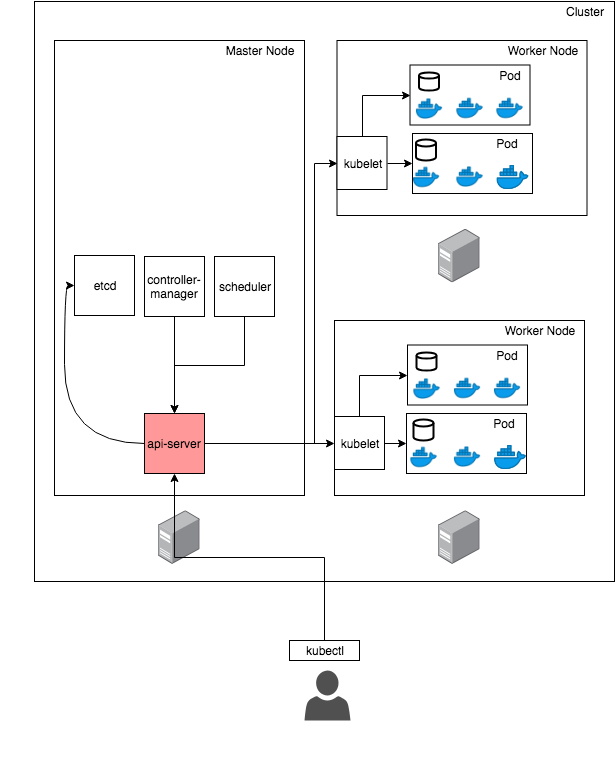
In Kubernetes, there are two types of Nodes, MasterNode and WorkerNode, and the list of components in the MasterNode can be seen from the above. For details, see here.
In other words, when you do kubectl apply -f nginx.yaml, it means
- Register the manifest (nginx.yaml) in etcd
- The controller-manager detects that there are fewer pods by comparing the manifest in etcd and the existing pods
- The scheduler adjusts to the appropriate number of pods
That's what I understood. Also, all interactions seem to go through the api-server.
Below is what I output based on my understanding. (It's mostly a copy. However, just outputting deepens understanding, so I did it. Output is important! )
~ $ kubectl get nodes
NAME                 STATUS    ROLES     AGE       VERSION
docker-for-desktop   Ready     master    120d      v1.10.3
~ $ kubectl get pods
No resources found.
When you first start using it, there are no pods. Also, in DockerForMac, of course, there is only one machine running (you can increase it with VM, etc.), so The MasterNode and WorkerNode should be the same. Let's try it.
# nginx.yaml
apiVersion: v1
kind: Pod
metadata:
  name: nginx
spec:
  containers:
    - name: nginx
      image: nginx
      ports:
        - containerPort: 80
          name: http
          protocol: TCP
~ $ kubectl apply -f nginx.yaml
pod "nginx" created
~ $ kubectl get pod -o wide
NAME      READY     STATUS    RESTARTS   AGE       IP           NODE
nginx     1/1       Running   0          3m        10.1.0.157   docker-for-desktop
A Pod is created on the WorkerNode. Hmm, this seems to lead to some learning (Pod movement), but It seems unsuitable if you want to experience features that cross Nodes, such as learning ReplicaSet and Daemonset later. Well, it's easy to use, so it's good...
Next, let's try some commands (cp, exec, port-forward).
~ $ touch memo.txt
~ $ ls
nginx.yaml memo.txt
~ $ kubectl cp memo.txt nginx:/memo.txt
~ $ rm memo.txt
~ $ ls
nginx.yaml
~ $ kubectl cp nginx:/memo.txt ./memo.txt
~ $ ls
nginx.yaml memo.txt
~ $ kubectl exec -it nginx bash
root@nginx:/# exit
exit
~ $
I experienced bidirectional copy between local and Pod, and virtual terminal. I was like, "Hmm, so what?" (laughs)
Cleaning up
~ $ kubectl delete -f nginx.yaml
pod "nginx" deleted
Not enough
I want to increase the Node after all!! Looking at Building home Kubernetes with Raspberry Pi【Logical Edition】, I have to do this! It's very late, but I'm going to try it. The next one is here.

If it was helpful, support me with a ☕!
Share
Related tags
- Cloud Native Days Tokyo 2019 - Participation Report for July 22-23, 2019
- Starting to Learn Kubernetes a Step Behind - 16. Components -
- Starting to Learn Kubernetes a Step Behind - 15. Security -
- Starting to Learn Kubernetes a Step Behind - 14. Scheduling -
- Osaka, Umeda - Participation Report for Kubernetes Meetup Tokyo 19 Osaka Satellite - May 31, 2019
- Starting to Learn Kubernetes a Step Behind - 13. Health Checks and Container Lifecycle -
- Starting to Learn Kubernetes a Step Behind - 12. Resource Limits -
- Starting to Learn Kubernetes a Step Behind - 11. config&storage Part 2 -
- Starting to Learn Kubernetes a Step Behind - 10. config&storage Part 1 -
- Osaka BMXUG Study Meeting -Kubernates Experience & Watson Discovery Introduction- Participation Report on March 27, 2019
- Starting to Learn Kubernetes a Step Behind - 09. discovery&LB Part 2 -
- Starting to Learn Kubernetes a Step Behind - 08. discovery&LB Part 1 -
- Starting to Learn Kubernetes a Step Behind - 07. Workloads Part 3 -
- Starting to Learn Kubernetes a Step Behind - 06. Workloads Part 2 -
- Starting to Learn Kubernetes a Step Behind - 05. workloads Part 1 -
- Starting to Learn Kubernetes a Step Behind - 04. kubectl -
- Starting to Learn Kubernetes a Step Behind - 03. Raspberry Pi -
- Starting to Learn Kubernetes a Step Behind - 01. Choosing the Environment -